Dr A D Marshall
Room M 1.38
Copyright David Marshall 1994-97
Lecture notes etc.
The X Window system is very large and this book does not attempt to detail every aspect of either X or Motif. This book is not intended to be a complete reference on the subject.
The book is organised into logical parts, it begins by introducing the X Window system and Motif and goes on to study individual components in detail in specific Chapters. In the remainder of this Chapter we concentrate on why Motif and related areas are important and give a brief history of the development of Motif.
There are many reasons and advantages to programming in X/Motif. A few of these are listed below:
The X Window system, or simply X, is very large. It has been through many different versions since its conception although things are now becoming fairly standardised and established.
This book does not attempt to cover all of the X system. We will only look at important parts of the system. Indeed we only study important parts of Motif which is itself a component (albeit a large and significant one) of X. We will where necessary introduce components of X that are not part of Motif. These other components will always be treated as if they are to be used with Motif.
Other important concepts relating to more general Graphical User Interface (GUI) design and programming will be studied. In most cases this is directly in relation to the Motif programming model. However, Motif was designed to adhere to standard GUI design approaches and has guidelines defined in the Motif Style Guide (Chapter 20,[Ope93]).
X provides functionality via a vast set of subroutine libraries. These may be called from a variety of high level languages.
They are most readily called from C programs as this is the language in which most of X is actually implemented in. We will only give C program examples in the main body of text. Appendix A gives details how to convert these examples into C++ and, more generally, write X/Motif applications in this language. Full program listings of both C and C++ are available from the online support and reference material [Mar96].
Readers should not be too worried about programming in C. We will not need to get heavily involved in C. Basically we will just be calling X/Motif functions and setting variables and data structures from our C programs. The ANSI C programming conventions are assumed in all examples.
In order to distinguish between program code and other text in this book the following fonts are used:
We have already used the notation of X/Motif. For convenience throughout this book, a reference to X is taken to mean the X Window System. We refer to Motif whilst strictly speaking the full title is OSF/Motif where OSF stands for the Open Software Foundation the original developers of Motif.
Before we study Motif in detail it is worth considering why we need GUIs and how they can be effectively designed and used.
GUIs provide an easy means of data entry and modification. They should provide an attractive and easy to use interface between human and machine. So easy in fact that a non-computer literate person could use the system.
GUI's provide a better means of communication than cumbersome text-based interfaces. Typically, GUIs provide such facilities by means of:
Although GUIs provide some very powerful advantages, there are a couple drawbacks to the GUI approach:
The subject of Graphical User Interface design is large. Indeed it is a major topic in Computer Science in its own right. Consequently, we could devote the rest of the book to this topic. However many standard GUI design rules are prescribed by Motif. Many of these rules are prescribed automatically, whilst others are strongly suggested in the Motif Style Guide (Chapter 20,[Ope93]). In general it is the low level appearance and operation of specific objects (Buttons, Menus etc.) that are automatically facilitated by Motif. The higher level organisation of these objects is left to the control of the application developer. Some perhaps are fairly obvious, though not always strictly adhered to, rules of thumb for GUI design include:
The Motif Style Guide (Chapter 20,[Ope93]) is a valuable source of information in relation to GUI design. Also the online reference material ([Mar96]) addresses further details on GUI design.
This Section briefy surveys the important stages in the development of GUIs leading the X/Motif approach to GUI design and programming. Once X began to establish itself as one of the prime systems for window programming some issues still remained unresolved until recently, these are also briefly addressed.
Computers first became commercially available in the 1950s. However, they were very large and expensive. They were also hard to program with very little thought was given to human computer interaction. By the 1960s very basic inroads into ease of computer use were being made with the development of more reliable operating systems. This was made possible as computers became smaller in size and more powerful in terms of processing ability. The first seeds of user interaction appeared in the form of early text editors during this period.
The start of the development of GUIs can be traced back to the early 1970's to Alan Kay's research group at Xerox's Palo Alto Research Centre. Two important projects were undertaken there:
The first commercial exploitation of the Xerox work was realised in the early 1980s by Apple, firstly with Lisa and then the Macintosh series of computers. The Apple GUI proved very successful and popular and by the late 1980s many operating systems had adopted the GUI approach. UNIX vendors such as Sun (with SunView) and Dec (with DEC Windows) and Microsoft with Windows for the PC are examples.
There was one problem with the above developments. Every manufacturer had its own proprietary windowing system. These were all entirely different and different systems could not easily communicate with each other. It had been common to have networks of the same computers for some time and it was relatively easy to get machines of the same type in a network configuration to talk to each other.
The X Window system arose out of this very real need. The X system was designed to be platform independent and network-based. With X the programmer can write a single application in a single language and run this program on different machines with little or no modification. Moreover, applications can actually run programs on one computer and have the results displayed on another (or several) computer's terminal. The computer can be a similar model or an entirely different one altogether. The possibilities are endless.
Following the creation of the X Window system, two primary high level X interface toolkits came to prominence:
Open Look was designed to support the X Window platform yet still maintain compliance with Sun's older native SunView Window system. Open Look had a slightly different design philosophy to Motif. Indeed for many years Sun claimed that Open Look was superior to Motif. At the time Sun were the substantial market leader vendor of UNIX platforms and therefore had a large influence on such matters. However, recently Sun decided to cease support of Open Look and adopt Motif.
Motif was based on IBM's Common User Access (CUA) guidelines as were both Microsoft Windows and OS/2. Consequently, the visual appearance and mode of operation, the so called look and feel , of Motif is similar to that of Microsoft Windows and OS/2. This was a deliberate strategy since there is sound business sense in profiting from an open system. More importantly, however, the predominance of Microsoft Windows in the PC market means that an interface that appears to the user to behave in a similar fashion to Microsoft Windows would be a logical choice in migrating (PC) applications to UNIX. It is probably a mixture of these factors that has led to Sun's decision to stop the development of Open Look and adopt Motif for Sun Workstations.
Following Sun's decision to support Motif, the Common Open Software Environment (COSE) united the major UNIX producers including Sun, DEC, IBM, Hewlett-Packard and UNIX System Laboratories. This has had a significant impact on the endorsement of Motif since it is now the standard choice for UNIX and general cross-platform GUI development. COSE has also prescribed choices of other X libraries concerned with 3D graphics (PEX) and Image extension (XIE) which are closely coupled to Motif.
Motif has undergone four major revisions since its conception. Motif 1.0 is now quite old and should probably be avoided as there has been significant upgrades to Motif and the underlying X system in later Motif versions. Motif 1.1 was the next major release but this releases does not support some useful later features, such as drag and drop. However, many applications can still run under Motif 1.1. Motif 1.2 has been available since 1993 and is based on Release 5 of the Xlib and Xt specifications (X11R5). This version of Motif should be in common circulation now.
The latest version of Motif is version 2.0 and it was released in late 1994 as was the latest release of X11 (X11R6). Motif 2.0 provides some significant enhancements and many bug fixes. However, Motif 2.0 is not yet being shipped by the major UNIX vendors. The main reason is that most UNIX vendors made a decision to support a new Common Desktop Envirnoment (see Section 1.5.2 below) system, CDE 1.0, which uses Motif 1.2 and is not binary compatible with Motif 2.0. It is likely that these companies will not now deliver Motif 2.0 but wait to support the convergence of both products with the newer releases of Motif (2.1) and CDE (1.1). It is expected that both these will become available sometime in 1997.
Even though there have been four major revisions to Motif there have been several minor revisions to Motif. These were mainly fix bugs (sometimes a few hundred at a time !!). However different vendors do not always keep to consistent minor version release numbers.
The subset of Motif addressed in this book has remained more or less untouched by the developments in Motif 2.0. Where there are differences these are highlighted in the text. The major differences that concern us here are the support of additional widgets (Chapter 6 and C++ binding (Appendix A). Chapter 21 discusses the key features of Motif 2.0. The new features of Motif 2.0 are generally concerned with advanced uses of Motif, and are not within the defined scope of this text. All examples in this book have been tested extensively on Motif 1.2 and X11R5. There should be no problem in running these examples under Motif 2.0 or X11R6.
In using and writing Motif programs you will inevitably be exposed to key parts of your computer. You will have to write Motif programs in a particlar computer language -- usually C or C++. In writing and running Motif applications you will need to interact with the host operating system. You may also need to suitably equip your operating to run or display Motif applications. In conjuction with the operating system, there will be a windowing environment that controls how windows are displayed and managed in general. This section introduces these issues and explains how you configure your system to run Motif applications.
X Window is designed to be platform independent. Provided that machines which are connected to a network and are suitably equipped with software to run X Window, running applications across any kind of network is possible.
For Unix systems X/Motif is now the only practical window system available. Unix machines will usually be already configured to run some version of X. For users of PCs and Macintosh computers, the standard window environment is Microsoft Windows or the Macintosh Window Interface respectively. For users of these machines there are two options to set up X Window:
There are a few other commercial packages available that run Unix/X Window environments on a PC and Macintosh.
Packages for the PC that allow this include SunSoft Inc.'s SolarNet PC-X 1.1, Hummingbird Communications Ltd. eXceed 5 for Windows, Network Computing Devices Inc.'s PC-Xware 3.0 and Walker Richer and Quinn Inc.'s Reflection Suite for Windows 5.0.
Package available to allow a Macintosh to become an X Server include Apple's MacX, Intercon's Planet X, Netmanage/AGE's XoftWare, Tenon XTen and White Pine's eXodus.
A free X server for PCs and Macintosh exists called MI/X.
The WWW site URL:http://www.rahul.net/kenton/xsites.html contains links to almost all the above systems.
Note that minimum configurations of many computers in terms of processor speed and/or memory are unlikely to be adequate to support X Window.
Built on top of the operating system is the windowing environment. This environment controls how windows are displayed and how events invoked by mouse selection, keystrokes etc. are processed. The general term for the housekeeping of windows is window management and further details on this will be discussed in Section 3.2. X window toolkits, such as Motif and Open Look, generally provide two key components: the window manager and the toolkit libraries.
The window manager basically defines the look and feel of a particular toolkit. However, with ever increasing windowing needs, the basic window manager and related system and common application needs have grown into a desktop environment providing a whole suite of tools including a window manager . The unification of the Unix and X Window providers with COSE has led to the vendors developing a unified desktop for Unix systems -- the Common Desktop Environment (CDE) [Add94g,Add94a,Add94e,Add94f,Add94c,Add94d,Add94b]. The CDE is built on top of Motif.
The CDE was designed to provide end users with a consistent graphical user interface across workstations and PCs, and software developers with a single set of programming interfaces for platforms that support the X Window System and Motif.
The CDE core components include:
Section 3.3 addresses the CDE from a user's perspective.
This books assumes a knowledge of ANSI/ISO C. All program examples are written in C. C++ is also a popular language for writing X Window programs. C++ actually supports ANSI/ISO C, so some minor modifications are all that is required to convert the C examples provided in this text to C++ (Appendix A). Both C and C++ example programs are available in the online reference material ([Mar96]). Motif 2.0 (Chapter 21) actually provides C++ support built in.
In order to be most productive in writing Motif it is advisable that you should have at your disposal standard C program developments tools (such as good compilers, editors, debugging tools etc). Section 5.5 discusses compilation issues further.
Throughout the development of X/Motif some key companies and consortia have been repsonsible for key aspects of the system. We briefly summarise these contibutions in this Section. Another key aspect to the development of Motif is the prescribed uniformity of Motif applications. The Motif Style Guide is the main reference to Motif application development.
The X Consortium distributes the X System and manuals at a minimal cost (basically the cost of distribution media and shipping). Motif is built on top of the X System.
The Open Group was formed in February, 1996 by the consolidation of the two leading open systems consortia, X/Open Company Ltd. and the Open Software Foundation (OSF). Under the Open Group umbrella, OSF and X/Open work together to deliver technology innovations and wide-scale adoption of open systems specifications. From the beginning of 1997 the Open Group will have responsibility for the X Window System transferred from the X Consortium.
For further information, the OSF, X Consortium and the Open Group can be contacted at the following addresses:
Open Software Foundation, 11 Cambridge Center Cambridge MA 02142. Tel
(USA): 617/621-8700. Email: info@osf.org WWW:
X Consortium Inc., One Memorial Drive PO BOX 546 Cambridge MA 02142-0004. Tel
(USA):617/374-1000. WWW:
Open Group, 11 Cambridge Center, Cambridge, MA 02142:
Tel
(USA): 617/621-7300. Email: info@opengroup.org WWW:
http://www.osf.org/
http://www.x.org/
http://www.opengroup.org/
The Common Open Software Environment (COSE) was formed when the major UNIX producers, including Sun, DEC, IBM, Hewlett-Packard and UNIX system Laboratories, decided to unite and attempt to standardise UNIX implementations worldwide in 1993. The remit of COSE is to define standard cross-platform UNIX systems incorporating application program interfaces, windows interfacing, desktop environments, graphics, multimedia, system management, support for distributed computing and large scale data management. The standardisation of a Common Desktop Environment (CDE) for UNIX resulted in the adoption of Motif for this purpose.
As such, the OSF, Open Group, and COSE can be regraded as the elders of Motif and future releases of Motif will be determined by them.
In late 1995, The OSF announced the formal signing of the Joint Development agreement for the further enhancement and evolution of the Common Desktop Environment and OSF/Motif under the OSF Prestructured Technology (PST) development process.
The Motif Style Guide[Ope93] can be regarded as the Bible for Motif Application developers. Along with a Motif Reference Manual [Mar96,Hel94b] and a programming text book (hopefully this text), the Motif Style Guide provides an invaluable source of information.
The Motif Style Guide provides a set of guidelines that provides a framework for the behaviour of Motif application developers, GUI developers, widget developers and window managers. The basic idea is that all Motif applications that adhere to the prescribed style will maintain a high level of consistency. Also, since Motif follows CUA guidelines, Motif applications will be similar to Microsoft Windows applications in terms of appearance and user operation. For developers of commercial applications, the adoption of Motif style is critical.
Many standard GUI issues are integrated into a Motif Widget default behaviour. Therefore, these defaults should only be modified with great care and consideration for such implications. Other aspects of style are left to the developer. The Motif Style Guide only suggests certain standard operations.
As has been mentioned, the Motif Style Guide has a greater scope than just the Motif application developer (the intended audience of this text). Chapter 20 summarises many important issues relating to the application developer. Where appropriate, specific style considerations are mentioned elsewhere in this text.
Throughout the long journey to learn Motif there are many useful sources of reference that could ease the burden. In recent years the Internet and the World Wide Web (WWW) has established itself as a very useful source for a variety of information types. X/Motif is no exception and the major distributors of X/Motif have WWW, email and ftp address. Many sites also contain frequently asked questions about general and specific X/Motif queries. News updates on major and minor release of X/Motif and tutorial material is also plentiful. This Chapter provides pointers to large repositories of such information in a variety of Internet and WWW distribution mediums.
Various components of X/Motif are distributed by the OSF, the X Consortium, the Open Group and by a number of independent vendors for a variety of platforms. Section 1.6.1 gives details on these matters.
The main WWW source of information for motif is MW3: Motif on the World Wide Web (URL: http://www.cen.com/mw3/). From the home page you can connect to a wealth of resources for Motif and X Window System development. MW3 presently contains over 700 links. Virtually all aspects of Motif are covered here.
Other useful WWW links include:
The Motif FAQ is available via ftp also at:
Other sources of information on the Internet are provided via mailing lists and news groups. Mailing lists are sent via email and serve as discussion groups and avenues for news announcements for particular topics. News groups can be read by specific news reader applications and broadly serve as discussion groups. Mailing lists and news groups do not necesarily require a WWW browser for reading although browsers such as Netscape Navigator do provide specific access to news groups and email.
The following public mailing lists are maintained by the X Consortium for the discussion of issues relating to the X Window System. All are hosted @x.org.
        To: xpert-request@x.org
        Subject: (none needed)

        subscribe
To unsubscribe:
        To: xpert-request@x.org
        Subject: (none needed)

        unsubscribe
To add an address to a specific list, or to add a specific user, you can specify options to the subscribe or unsubscribe command. This example adds dave@widget.uk to the xpert mailing list:
        To: xpert-request@x.org
        Subject: (none needed)

        subscribe xpert dave@widget.uk
This mailing list is gatewayed to the newsgroup comp.windows.x.announce.
Subscription requests should be sent to xannounce-request@x.org.
The news group comp.windows.x.motif is the main news group for Motif related issues. The following news groups exist for the discussion of other issues related to the X Window System:
Most of the above news groups have a frequently asked question section posted regularly to the news group which provide valuable information for the novice and discuss common problems. The comp.windows.x.motif are also accessible from many of the WWW sites listed in Section 21.3.2
At the highest level of X there are two basic features: The window manager and the toolkit. The window manager (wm) controls GUI aspects such as appearance of windows and interaction with the user. The toolkits are C subroutine libraries where we describe how to contsruct the GUI and how to attach the GUI to the remainder of the application. Motif is one such toolkit. Motif is built on other toolkits in the X System: Xt Intrinsics , an intermediate level toolkit, and the low level X Library (Xlib) . The relevance of these will be made apparent in due course.
All forms of displaying of information in X are bit-mapped which means that every pixel on the screen is individually controllable. Therefore we can draw pictures and use text. The requirement for bit-mapped graphics means that high quality monitors are necessary. However, most computer systems provide monitors of this type.
X, like most other windowing systems, divides the screen into various parts that control input and output. Each part is called a window . A window can have many uses. A window can display graphics, receive input from a mouse, act as a standard terminal (e.g. an Xterm -- a standard text based terminal emulation window) etc..
Not all applications need to consist of a single window. We can have many windows associated with different parts of one application. Each subwindow is called a child and it usually remains under the control of it's parent window.
There is one special window, the background or root window. All other windows are children of the root .
Controlling the window environment is not easy and has many facets. For instance, there may be multiple applications running simultaneously and a conflict may arise for input:
Does a keyboard input go in a window where the mouse currently points or must a window be explicitly chosen?
The window manager is also predominantly responsible for the appearance and user interaction (the look and feel) of the interface. Since the development of X, there have been a few different window managers. The look and feel varies a lot between each window manager. The Motif window manager (mwm) is probably the window manager you are most familiar with as this comes with the Motif system. Other window managers include Sun's Open Look window manager ( olwm) and the Tab or Tom's window manager (twm) .
Most major Unix vendors now supply the CDE which by default runs the desktop window manager, dtwm . The development of the common desktop will probably result in dtwm superseding mwm. The CDE default window manager can easily be altered to run the above altenative window managers if desired. Since the CDE is built on top of motif there are many similarities between dtwm and mwm (see Section 3.4 below).
The Motif look and feel , as defined by the Motif Style Guide, is basically enforced by mwm or dtwm. Consequently, interaction between applications and these window managers are eased if the applications obey standard Motif/CDE guidelines.
Most major Unix vendors now provide the CDE as standard. Consequently, most users of the X Window system will now be exposed to the CDE. Indeed, continuing trends in the development of Motif and CDE will probably lead to a convergence of these technologies in the near future. This section highlights the key features of the CDE from a Users perspective.
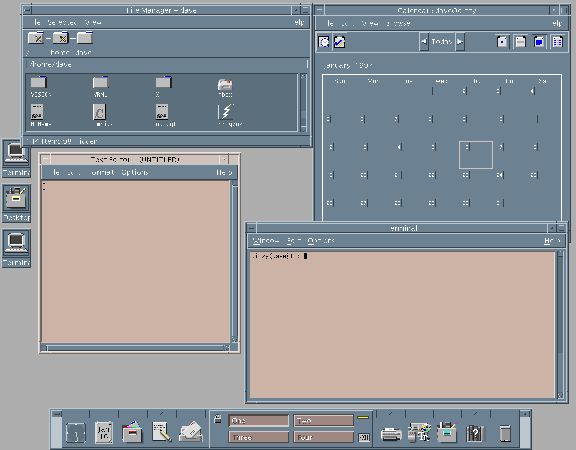
Upon login, the user is presented with the CDE Desktop (Fig. ![]() ). The
desktop includes a front panel (Fig. 3.2) , multiple virtual workspaces, and window management. CDE
supports the running of applications from a file manager, from an application
manager and from the front panel. Each of the subcomponents of the desktop are
described below.
). The
desktop includes a front panel (Fig. 3.2) , multiple virtual workspaces, and window management. CDE
supports the running of applications from a file manager, from an application
manager and from the front panel. Each of the subcomponents of the desktop are
described below.
Fig. 3.1 Sample CDE Desktop
The front panel (Fig. 3.2) contains a set of icons and popup menus (more like roll-up menus) that appear at the bottom of the screen, by default (Fig. 3.1). The front panel contains the most regularly used applications and tools for managing the workspace. Users can drag-and-drop application icons from the file manager or application manager to the popups for addition of the application(s) to the associated menu. The user can also manipulate the default actions and icons for the popups. The front panel can be locked so that users can't change it. A user can configure several virtual workspaces -- each with different backgrounds and colors if desired. Each workspace can have any number of applications running in it. An application can be set to appear in one, more than one, or all workspaces simultaneously.
Fig. 3.2 CDE Front Panel
CDE includes a standard file manager. The functionality is similar to that of the Microsoft Windows, Macintosh, or Sun Open Look file manager. Users can directly manipulate icons associated with UNIX files, drag-and-drop them, and launch associated applications.
The user interaction with the application manager is similar to the file manager except that is is intended to be a list of executable modules available to a particular user. The user launches the application manager from an icon in the front panel. Users are notified when a new application is available on a server by additions (or deletions) to the list of icons in the application manager window. Programs and icons can be installed and pushed out to other workstations as an integral part of the installation process. The list of workstations that new software is installed on is configurable. The application manager comes preconfigured to include several utilities and programs.
The session manager is responsible for the start up and shut down of a user session. In the CDE, applications that are made CDE aware are warned via an X Event when the X session is closing down. The application responds by returning a string that can be used by the session manager at the user's next login to restart the application. CDE can remember two sessions per user. One is the current session, where a snapshot of the currently running applications is saved. These applications can be automatically restarted at the user's next login. The other is the default login, which is analogous to starting an X session in the Motif window manager. The user can choose which of the two sessions to use at the next login.
CDE 1.0 includes a set of applications that enable users to become productive immediately. Many of these are available directly from the front panel, others from the desktop or personal application managers. Common and productive desktop tools include:
CDE[Add94g,Add94a,Add94e,Add94f,Add94c,Add94d,Add94b] includes two components for application development. The first is a shell command language interpreter that has built-in commands for most X Window system and CDE functions. The interpreter is based on ksh93[Add93b,Add93a], and should provide anyone familiar with shell scripts the ability to develop X, Motif, and CDE applications.
To support interactive user interface development, developers can use the Motif Application Builder. This is a GUI front end for building Motif applications that generates C source code. The source code is then compiled and linked with the X and Motif libraries to produce the executable binary.
CDE provides a number of tools to ease integration. The overall model of the CDE session is intended to allow a straightforward integration for virtually all types of applications. Motif and other X toolkit applications usually require little integration.
The task of integrating in-house and third party applications into a desktop, often the most difficult aspect of a desktop installation, is simplified by CDE. The power and advantage of CDE functionality can be realized in most cases without recompiling applications.
For example, Open Look applications can be integrated through the use of scripts that perform front-end execution of the application and scripts that perform pre- and post-session processing.
After the initial task of integrating applications so that they fit within session management, further integration can be done to increase their overall common look-and-feel with the rest of the desktop and to take advantage of the full range of CDE functionality. Tools that ease this aspect of integration include an Icon Editor used to create colour and monochrome icons. Images can be copied from the desktop into an icon, or they can be drawn freehand.
The Action Creation Utility is used to create action entries in the action database. Actions allow applications to be launched using desktop icons, and they ease administration by removing an application's specific details from the user interface.
The Application Gather and Application Integrate routines are used to control and format the application manager. They simplify installations so that applications can be accessible from virtually anywhere on the network.
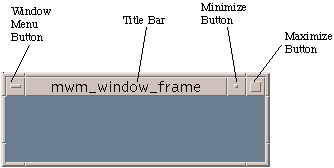
From a user's perspective, one of the first distinguishing features of Motif's look and feel is the window frame (Fig. 3.3). Every application window is contained inside such a frame. The following items appear in the window frame:
Fig. 3.3 The Motif Window Frame
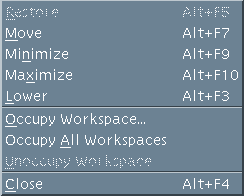
Fig. 3.4 The Window Menu
The window manager must also be able to manage multiple windows from multiple client applications. There are a few important issues that need to be resolved. When running several applications together, several windows may be displayed on the screen. As a result, the display may appear cluttered and hard to navigate. The window manager provides two mechanisms to help deal with such problems:
The exact appearance of the above may vary from system to system and may be controlled by the user by setting environment settings in the window manager.
The window menu has a few options for controlling the tiling of a window. Also a window can be brought to the top of the stack, or raised by clicking a part of its frame.
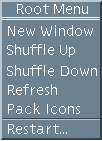
The Root Menu is the main menu of the window manager. The root menu typically is used to control the whole display, for example starting up new windows and quitting the desktop. To display the Root menu:
The default Root Menu has the following The root menu can be customised to start up common applications for example. The root menu for the mwm (Fig. 3.6) and dtwm (Fig. 3.7) have slightly different appearance but have broadly similar actions, which are summarised below:
Fig. 3.6 The mwm Root Menu
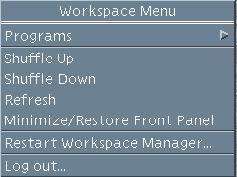
Fig. 3.7 The CDE dtwm Root Menu
Exercise 8179
Compare OPEN LOOK and MOTIF window managers CDE ON SUN???.
Exercise 8180
Add applications to the application manager
This Chapter introduces the basic concepts and principles that are of concern to the Motif programmer. We define basic system concepts, describe the three basic levels of the X programming model and describe basic Motif components.
X requires a system that consists of workstations capable of bit-mapped graphics. These can be colour or monochrome.
A display is defined as a workstation consisting of a keyboard, a pointing device (usually a mouse although it could be a track ball or graphics tablet, for instance) and one or more screens.
X is network oriented and applications need not be running on the same system as the one supporting the display. This can sometimes be quite complicated for a system such as X to manage and so the concept of clients and servers was introduced.
You need not worry too much about the practicality of this, as normally X makes this transparent to the user -- especially if we run programs on a single workstation. However, in order to fully understand the workings of X, some notion of these concepts is required.
The program that controls each display is known as the server . This terminology may seem a little odd as we may be used to the server as something across the network such as a file server. Here, the server is a local program that controls our display . Also our display may be available to other systems across the network. In this case our system does act as a true display server.
The server acts as a go-between between user programs, called clients or applications and the resources of the local system. These run on either local or remote systems.
Tasks the server performs include:
The client and server are connected by a communication path called ( surprise, surprise) the connector . This is performed by a low-level C language interface known as Xlib . Xlib is the lowest level of the X system software hierarchy or architecture (Fig 4.1). Many applications can be written using Xlib alone. However, in general, it will be difficult and time consuming to write complex GUI programs only in Xlib. Many higher level subroutine libraries, called toolkits , have been developed to remedy this problem.
Note: X is not restricted to a single language, operating system or user interface. It is relatively straightforward to link calls to X from most programming languages. An X application must only be able to generate and receive messages in a special form, called X protocol messages . However, the protocol messages are easily accessible as C libraries in Xlib (and others).
There are usually two levels of toolkits above Xlib
An application program in X will usually consist of two parts. The graphical user interface written in one or more of Xlib, Xt or Motif and the algorithmic or functional part of the application where the input from the interface and other processing tasks are defined. Fig. 4.1 illustrates the relationships between the application program and the various parts of the X System.
Fig. 4.1 The X Programming Model The main concern of this text is to introduce concepts in building the graphical user interface in X and Motif in particular. We now briefly describe the main tasks of the three levels of the X programming model before embarking on writing Motif programs.
The main task of Xlib is to translate C data structures and procedures into the special form of X protocol messages which are then sent off. Obviously the converse of receiving messages and converting them to C structures is performed as well. Xlib handles the interface between client (application) and the network.
They allow applications to manipulate these features using object-oriented techniques.
X Toolkit Intrinsics or Xt Intrinsics are a toolkit that allow programmers to create and use new widgets.
If we use widgets properly, it will simplify the X programming process and also help preserve the look and feel of the application which should make it easier to use.
We will have to call some Xt functions when writing Motif programs since Motif is built upon Xt and thus needs to use Xt. However, we do notneed to fully understand the workings of Xt as Motif takes care of most things for us.
X allows extensions to the Xt Intrinsics toolkit. Many software houses have developed custom features that make the GUI's appearance attractive, easy to use and easy to develop. Motif is one such toolkit.
The third party toolkits usually supply a special client called the window manager
The basic unit of currency of Motif is the widget . The widget is the basic building block for the GUI. It is common and beneficial for most GUIs assembled in Motif to look and behave in a similar fashion. Motif enforces many of these features by providing default actions for each widget. Motif also prescribes certain other actions that should, whenever possible, be adhered to. Information regarding Motif GUI design is provided in the Motif Style Guide [Ope93]. We now briefly address general issues relating to Motif widgets and style.
A widget, in Motif, may be regarded as a general abstraction for user-interface components. Motif provides widgets for almost every common GUI component, including buttons, menus and scroll bars. Motif also provides widgets whose only function is to control the layout of other widgets -- thus enabling fairly advanced GUIs to be easily designed and assembled.
A widget is designed to operate independently of the application except through well defined interactions, called callback functions . This takes a lot of mundane GUI control and maintenance away from the application programmer. Widgets know how to redraw and highlight themselves, how to respond to certain events such as a mouse click etc. Some widgets go further than this, for example the Text widget is a fully functional text editor that has built in cut and paste as well as other common text editing facilities.
The general behaviour of each widget is defined as part of the Motif (Xm) library. In fact Xt defines certain base classes of widgets which form a common foundation for nearly all Xt based widget sets. Motif provides a widget set, the Xm library, which defines a complete set of widget classes for most GUI requirements on top of Xt (Fig 4.1).
The Motif Reference Manual [Hel94b] provides definitions on all aspects of widget behaviour and interaction. Basically, each widget is defined as a C data structure whose elements define a widget's data attributes, or resources and pointers to functions, such as callbacks.
Each widget is defined to be of a certain class . All widgets of that class inherit the same set of resources and callback functions. Motif also defines a whole hierarchy of widget classes. There are two broad Motif widget classes that concern us. The Primitive widget class contains actual GUI components, such as buttons and text widgets. The Manager widget class defines widgets that hold other widgets.
Chapter 5 introduces basic Motif widget programming concepts and introduces how resources and callback functions are set up. Chapter 6 then goes on to fully define each widget class and the Motif widget class hierarchy. Following Chapters then address each widget class in detail.
The Motif Style Guide should be read by every Motif Application developer. The Style Guide is not intended to be a Motif programming manual. This book is not intended to be a a complete guide to Motif style. The books should be regarded as essential companions along with a good Motif reference source.
The Motif Style Guide provides a set of guidelines that specify a framework for the behaviour of Motif application developers, GUI developers, widget developers and window managers. Many standard GUI design and behaviour issues are integrated into a Motif widget's default settings. Therefore these defaults should only be modified with great care and consideration. Other aspects of style are left to the developer. The Motif Style Guide only suggests certain standard operations, but where appropriate these should be adopted.
The Motif Style Guide prescribes many common forms of interaction and interface design. For example, it defines how menus should be constructed, used and organised. Chapter 20 summarises all the common style concerns for the Motif programmer. Where appropriate specific reference is made in individual Sections to Motif style for a particular widget.
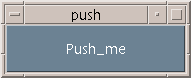
Our program, push.c , will create a window with a single push button in it. The button contains the string, ``Push Me''. When the button is pressed (with the left mouse button) a string is printed to standard output. We are not yet in a position to write back to any window that we have created. Later Chapters will explore this possibility. However, this program does illustrate a simple interface between Motif GUI and the application code.
The program also runs forever. This is a key feature of event driven processing. For now we will have to quit our programs by either:
In forthcoming Chapters (see also Exercise 5.1) we will see how to quit the program from within our programs.
The display of push.c on screen will look like this:
Fig. 5.1 Push.c display
As was previously stated, the main purpose of studying the program is to gain a fundamental understanding of Motif programming. Specifically the lessons that should be clear before embarking on further Motif programs are:
We now list the complete program code and then go on to study the code in detail in the remainder of this Chapter.
The complete program listing for the push.c program is as follows:
#include <Xm/Xm.h>
#include <Xm/PushB.h>

/* Prototype Callback function */

void pushed_fn(Widget , XtPointer ,
               XmPushButtonCallbackStruct *);


main(int argc, char **argv)

{   Widget top_wid, button;
    XtAppContext  app;

    top_wid = XtVaAppInitialize(&app, "Push", NULL, 0,
        &argc, argv, NULL, NULL);

    button = XmCreatePushButton(top_wid, "Push_me", NULL, 0);
    /* tell Xt to manage button */
				XtManageChild(button);

				/* attach fn to widget */
    XtAddCallback(button, XmNactivateCallback, pushed_fn, NULL);

    XtRealizeWidget(top_wid); /* display widget hierarchy */
    XtAppMainLoop(app); /* enter processing loop */

}

void pushed_fn(Widget w, XtPointer client_data,
               XmPushButtonCallbackStruct *cbs)
  {
     printf("Don't Push Me!!\n");
  }
When writing a Motif program you will invariably call upon both Motif and Xt functions and data structures explicitly. You will not always call Xlib functions or structures explicitly (but recall that Motif and Xt are built upon Xlib and they may call Xlib function from their own function calls).
In order to distinguish between the various toolkits, X adopts the following convention:
In order to be able to use various Motif, Xt Intrinsics or Xlib data structures we must include header files that contain their definitions.
The X system is very large and there are many header files. Motif
header files are found in #include<Xm/...> subdirectories, the Xt
and Xlib header files in #include<X11/...> subdirectories (E.g.
the Xt Intrinsic definitions are in #include<X11/Intrinsics.h>).
Every Motif widget has its own header file, so we have to include the
<Xm/PushB.h> file for the push button widget in push.c.
We do not have to explicitly include the Xt header file as <Xm/Xm.h> does
this automatically. Every Motif program will include <Xm/Xm.h> -- the
general header for the motif library.
-lXm -lXt -lX11 from the compiler command
line. NOTE: The order of these is important.
So to compile our push.c program we should do:
cc push.c -o push -lXm -lXt -lX11
The exact compilation of your Motif programs may require other compiler directives that depend on the operating system and compiler you use. You should always check your local system documentation or check with your system manager as to the exact compilation directives. You should also check your C compiler documentation. For example you may need to specify the exact path to a nonstandard location of include (-I flag) or library (-L flag) files. Also our push.c program is written with ANSI style function calls and some compilers may require this knowledge explicitly. Some implementations of X/Motif do not strictly adhere to the ANSI C standard. In this case you may need to turn ANSI C function prototyping etc. off.
Having successfully complied you Motif program the command:
push
should successfully run the program and display the PushButton on the screen.
Let us now analyse the push.c in detail. There are six basic steps that nearly all Motif programs have to follow. These are:
We will now look at each of these steps in detail.
The initialisation of the Xt Intrinsics toolkit must be the first stage of any basic Motif program.
There are several ways to initialise the toolkit. XtVaAppInitialize() is one common method. For most of our programs this is the only one that need concern us.
When the XtVaAppInitialize() function is called, the following tasks are performed:
XtVaAppInitialize() has several arguments:
&argc and argv contain the values of any command line argument
given. These arguments may be used to receive command line input of data in
standard C fashion (e.g. filenames for the program to read). Note that
the command line may be used (Section There are several ways to create a widget in Motif:
We will introduce the convenience functions shortly but for now we will continue with the simpler first method of widget creation.
In general we create a widget using the function:
XmCreate<widget name>().
So, to create a push button widget we use
XmCreatePushButton()
Most XmCreate<widget name>() functions take 4 arguments:
"Push_Me" - in
push.c.
The argument list can be used to set widget resources (height, width etc.)
at creation. The name of the widget may also be important when setting a
widget's resources. The actual resources set depend on the class of the widget
created. The individual Chapters and reference pages on specific widgets list
widget resources. Chapter ![]() deals with general issues of
setting resources and explores the methods described here further.
deals with general issues of
setting resources and explores the methods described here further.
When this happens all aspects of the widget are placed under the control of its parent. The most important aspect of this is that if a widget is left unmanaged, then it will remain invisible even when the parent is displayed. This provides a mechanism with which we can control the on screen visibility of a widget -- we will look at this in more detail in Chapter 10. Note that if a parent widget is not managed, then a child widget will remain invisible even if the child is managed.
Let us leave this topic by noting that we can actually create and manage a
widget in one function called XtVaCreateManagedWidget(). This function can
be used to create any widget. We will meet this function later in the
Chapter ![]() .
.
When a widget is created it will automatically respond to certain internal events such as a window manager request to change size or colour and how to change appearance when pressed. This is because Xt and Motif frees the application program from the burden of having to intercept and process most of these events. However, in order to be useful to the application programmer, a widget must be able to be easily attached to application functions.
Widgets have special callback functions to take care of this.
An event is defined to be any mouse or keyboard (or any input device) action. The effect of an event is numerous including window resizes, window repositioning and the invoking functions available from the GUI.
X handles events asynchronously , that is, events can occur in any order. X basically takes a continuous stream of events and then dispatches them according to the appropriate applications which then take appropriate actions (remember X can run more than one program at a time).
If you write programs in Xlib then there are many low level functions for handling events. Xt, however, simplifies the event handling task since widgets are capable of handling many events for us (e.g. widgets are automatically redrawn and automatically respond to mouse presses). How widgets respond to certain actions is predefined as part of the widget's resources. Chapter 17 gives a practical example of changing a widget's default response to events.
An example of part of the translation table for the push button is:
bBtn1downn:    Activate(), Disarm()BSelect Press: 		Arm()
BSelect Click: 		 Activate(), Disarm()
BSelect Press corresponds to a left mouse pressed down and the action is
the Arm() function being called which cause the display of the button to
appear as it was depressed. If the mouse is clicked (pressed and released), then
the Activate() and Disarm() functions are called, which will cause
the button to be reactivated.
Keyboard events can be listed in the table as well to provide facilities such as hot keys, function/numeric select keys and help facilities. These can provide short cuts to point and click selections.
Examples include: KActivate -- typically the return key,
KHelp -- the HELP or F1 key.
The function Arm(), Disarm() and Activate() are examples of predefined callback functions.
For any application program, Motif will only provide the GUI. The Main body of the application will be attached to the GUI and functions called from various events within the GUI.
To do this in Motif we have to add our own callback functions.
In push.c we have a function pushed_fn() which prints to standard output.
The function XtAddCallback() is the most commonly
used function to attach a function to a widget.
It has four arguments:
In addition to performing a job like highlighting the widget, each event action can also call a program function. So, we can also hang functions off the arm, disarm etc. actions as well. We use XmNarmCallback, XmNdisarmCallback names to do this.
So, if we wanted to attach a function quit() to a disarm for the button widget, we would write:
XtAddCallback(button, XmNdisarmCallback, quit, NULL);
Let us now look at the declaration of the application defined callback function. All callback functions have this form.
void pushed_fn(Widget w,
               XtPointer client_data,
               XmPushButtonCallbackStruct *cbs)
The first parameter of the function is the widget associated with the function (button in our case).
The second parameter is used to pass client data to the function. We will see how to attach client data to a callback later. We do not use it in this example so just leave it defined as above for now.
The third parameter is a pointer to a structure that contains data specific to the particular widget that called the function and also information about the event that triggered the call.
The structure we have used is a XmPushButtonCallbackStruct . A Callback Structure has the following general form:
typedef struct {
     int reason;
     XEvent *event;
     .... widget specifics ... } Xm<widget>CallbackStruct;
The reason element contains information about the callback such as whether arm or disarm invoked the call and the event element is a pointer to an (Xlib) XEvent structure that contains information about the event.
We have nearly finished our first program. We have two final stages to perform which every Motif program has to perform. That is to tell X to:
Exercise 8295
Write a Motif program that displays a button labelled ``Quit'' which terminates the program when the button is depressed with the left mouse button.
In the last Chapter we introduced some basic Motif programming concepts and introduced one specific widget, the PushButton, used in the example program developed. There are many other classes of widgets defined in Motif. Motif widgets are provided to perform a wide variety of common GUI tasks. This Chapter overviews the classes of Motif widgets. Following Chapters go on to study individual widgets in detail.
The organisation of a large system of GUI components in Motif can be quite complex. In order to aid the design and understanding of Motif various widget classes have been constructed. Each class can be categorised by a broad functionality, at a variety of levels. Motif defines a hierarchy of widget classes (Fig 6.1) and a widget will inherit properties from a higher class in the widget hierarchy (Section 6.5). Some levels of the hierarchy have strong relationships with Xt Intrinsics since widgets are actually created in this toolkit.
Fig. 6.1 Widget Hierarchy The levels of the hierarchy and a broad functionality of each level are:
All widgets are contained in a shell widget. This is usually the top level widget. The primary function of a shell widget is as an interface to the window manager.
The application shell is normally the top level for an application and is created by XtVaAppInitialze() or related functions.
There are two other shells:
Constraint widgets are concerned with the positioning and alignment of widgets contained within them. XmManager is a (Motif) subclass of the constraint widget specifying general manager facilities concerned with,for example, callbacks and highlight colour.
Within each of these basic classes, several different sub-classes of widget are defined.
The broad function of each class is as follows:
Following Chapters will give details and examples of all types of widgets. For the remainder of this chapter we will give a brief introduction to these widgets.
The following primitive widgets are defined in Motif:
Motif 2.0 also prescribes another form of text widget, CSText . This widget provides the same facilities a the Text widget but uses an alternative (compound) text string representation, XmString (Section 6.6), which is capable of supporting multiple fonts .
There may be occasions in Motif programming when we want to have the properties of a primitive widget but do not wish to worry about the management of the window properties of the widget. Motif has to manage each created widget's window and associated resources. If we have several widgets within our interface this could cause complications for our application.
To attempt to alleviate many of these problems Motif provides Gadgets . Gadgets are basically windowless widgets and, therefore, require less resources than a widget. Control of the gadget is the responsibility of the parent of the gadget.
Not all widgets have corresponding gadgets. The following gadgets are available: ArrowButton, Label and Separator. They behave in a similar manner to their corresponding widgets.
We will not consider gadgets further in this book since our programs are relatively simple and the relevance of their use cannot be effectively illustrated. The primary use of gadgets is when there is a real need to save memory on the X server or within the application. Gadgets may actually increase computer processor load since X finds some events more difficult to track within them. Gadgets are basically an artefact from earlier versions of Motif that were developed when window construction and management was more critical. Later versions of X have optimised the X server and coupled with the fact that computer power has increased and memory is less expensive, the use of gadgets is not as important as it once used to be.
Manager widgets are the basic Motif widgets for constructing and organising our interfaces in Motif. The following manager widget classes are available:
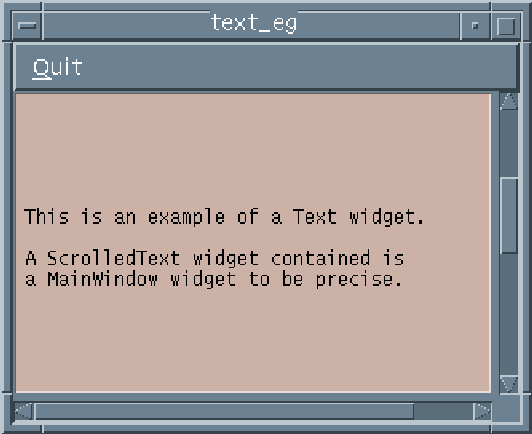
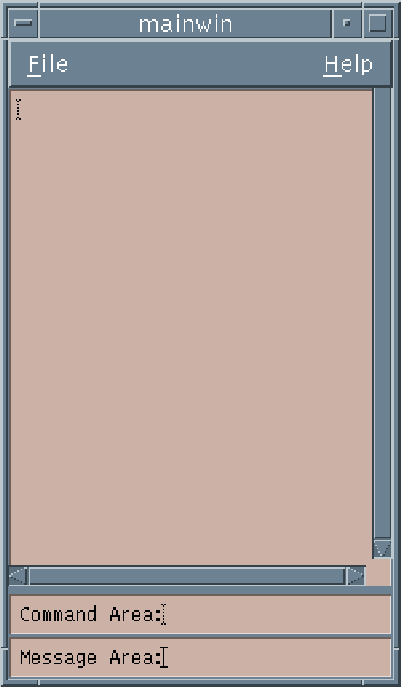
One common subclass of the ScrolledWindow widget is the MainWindow widget:
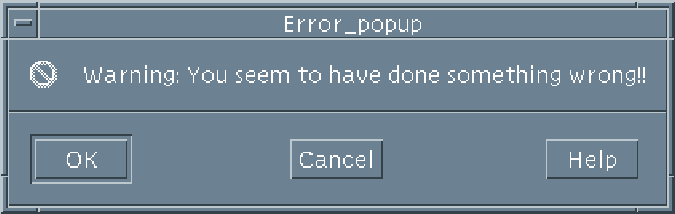
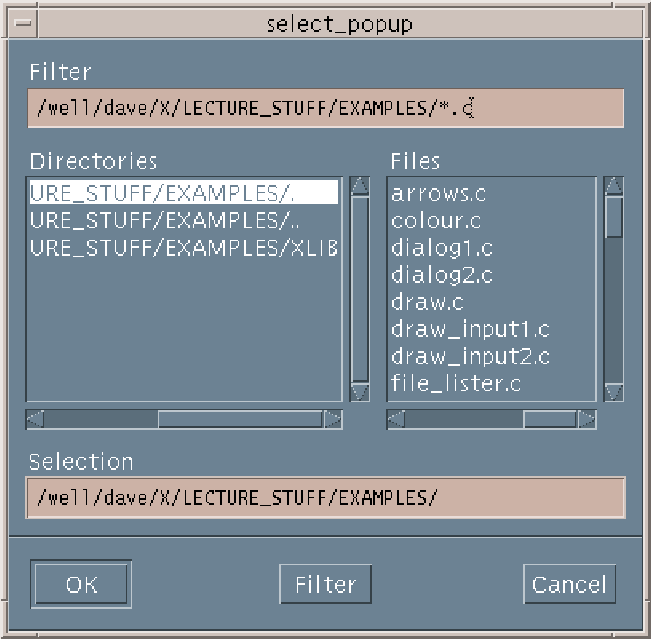
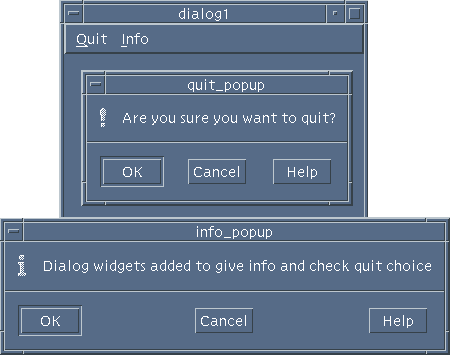
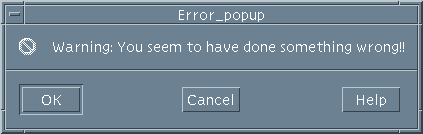
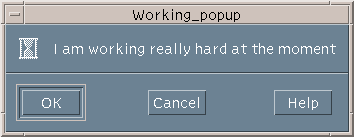
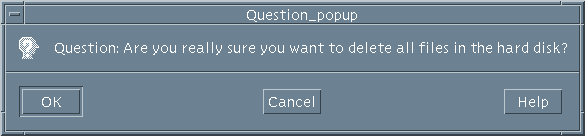
Dialog widgets, as the name implies, provide the direct line of communication between the user and the application. In the case of the MessageBox widgets this could simply be the program informing the user of some event or action. There are several prescribed classes of MessageBox widgets that are associated with a special event. For example there are WarningDialog, InformationDialog and ErrorDialog widgets (Fig. 6.16). Also some form of prescribed user interaction is provided by the Command and FileSelectionBox widgets. Motif also provides base MessageBox and SelectionBox widgets so that the programmer can assemble customised Dialogs. However, Motif programming style (Chapter 20) suggests that wherever appropriate the prescribed Dialog widgets should be used to provide uniformity across applications. Chapter 10 deals with many aspects of Dialog widget programming and usage.
Motif 2.0 defines a few new Manager widgets:
The use of many of these new widgets is fairly advanced and, except where indicated, these widgets are not dealt with further in this introductory text. Chapter 21 gives some further details on Motif 2.0.
Every widget is documented in the Motif Reference Manual ([Hel94b]) which gives a complete list of the resources that a particular widget employs. When discussing individual widgets we will only consider the important resources that define the main characteristics of the widget concerned. The following Chapter addresses how widget resources can be set and altered for a given application.
There is a hierarchy of widgets (Fig 6.1) and a widget will inherit resources from a higher resource class in the widget hierarchy.
The levels of the hierarchy and related widget resources are:
Motif programs (in C/C++) will typically need to use both types of string available:
Motif provides a number of functions to convert a String into an XmString or vice versa:
XmStringCreateLocalized(),XmStringCreateLtoR(), XmStringGetLtoR(), XmStringCompare(), XmStringConcat(), XmStringCopy(), etc. are common examples. Many behave in a similar manner to their C standard library string handling function counterparts.
Their use is fairly straightforward -- the reference manuals should be consulted for more details.
NEED SOME MORE
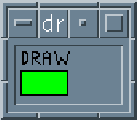
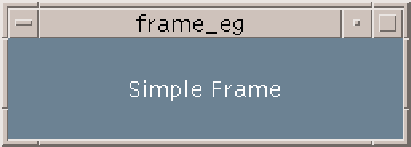
Exercise 8395 (1)
Run the following program (frame.c ) and note the difference in appearance and interaction of the widget with the push.c program (Chapter 5). Note the effect of the XmNshadowType resource. What other settings are available for this resource and what effect do they have?
/* frame.c --
 mount pushbutton of push.c in a frame widget
 */

#include <Xm/Xm.h>
#include <Xm/PushB.h>
#include <Xm/Frame.h>  /* header file for frame stuff */

/* Prototype callback */

void pushed_fn(Widget , XtPointer ,
               XmPushButtonCallbackStruct *);

main(int argc, char **argv)
{
    Widget        top_wid, button, frame;
    XtAppContext app;


    top_wid = XtVaAppInitialize(&app, "Push", NULL, 0,
        &argc, argv, NULL, NULL);


    frame = XtVaCreateManagedWidget("frame",
         xmFrameWidgetClass, top_wid,
         XmNshadowType, XmSHADOW_IN,
         NULL);


    button = XmCreatePushButton(frame, "Push_me",
        NULL, 0);

    XtManageChild(button);

    XtAddCallback(button, XmNactivateCallback, pushed_fn, NULL);

    XtRealizeWidget(top_wid);
    XtAppMainLoop(app);
}

void
pushed_fn(Widget w, XtPointer client_data,
          XmPushButtonCallbackStruct *cbs)

{
    printf("Don't Push Me!!\n");
}
Exercise 8397
Rewrite the frame.c program (Exercise 6.1) so that it displays a button labelled ``Quit Frame'' which terminates the program when the button is depressed with the left mouse button.
Exercise 8398
Write a program that inputs the string ``X Convert Me!!'' as a standard String data type and converts the string to an XmString data type. The program should also extract the substring "Convert Me!!" from the XmString and store it as a String.
Every Motif widget has a number of resources that control or modify its behaviour and appearance. Depending on the widget's class, resources control aspects such as the size of the widget, the colour of the widget, whether scroll bars should be displayed and many other properties.
When a widget is created it inherits resources from a higher widget class and also creates its own (Section 6.5). All these resources have default values. It would be tedious to specify 30 plus resource values each time we create a widget.
However the application programmer or user may want to customise one or two resources in order to control a widget's size in a GUI or its dimensions on the screen, for example.
Throughout this Chapter we will use the PushButton program, push.c, developed in Chapter 5 as a case study and we shall see how we alter the size (width and height) of the button. The resource variables XmNwidth and XmNheight hold these values.
There are a few ways in which we can alter a particular resource's value.
Broadly, there are two methods of altering resources in Motif:
The advantage of using external files is that it allows the user to customise Motif applications without having to recompile the program. The user may never need to access the source code. Applications may also be customised each time they are run. Due to the wide variety of possible systems running X and a vast range of user needs this can be a useful feature. For example, screen resolutions vary a great deal from device to device and what may be a visually adequate size for a widget on one display may be totally inadequate on another. Also certain resources, particularly colour displays, may vary substantially across different platforms.
There are four basic ways to externally customise an application:
One problem with the external setting of resource values occurs if it has already been hard-coded, since hard-coded resource values have a higher precedence than all externally set resources.
There are some advantages to hard-coding resource values :
A trade-off is sometimes required between applying hard-coding and allowing user freedom.
There is one other internal coding method for changing resources, by using what are called fallback resources . As their name implies fallback resources are set only if a resource has not been set by any of the above means. Fallbacks are therefore useful for setting alternatives to the default Motif resource settings.
The remaining sections in this Chapter detail how each individual resource setting method may be used.
When Motif initialises the application it looks for the .Xdefaults file in your HOME directory. The .Xdefaults file is a standard text file, where each line may contain a resource value setting, a blank line or a comment denoted by an exclamation mark (!). This file contains directives that can reset any resource for any application, using the following method:
application_class_name.widget_name.resource_name.
Note that when referring to resource names outside a program, the XmN part of the resource is dropped from the resource name. So, the width and height of the PushButton widget in the push.c application are referred to by:
Push.Push_me.width or Push.Push_me.height
! Comment: Set push application, PushButton dimensions

Push.Push_me.width: 200
Push.Push_me.height: 300
where 200 and 300 are the widget's new dimensions. Note that there is a colon separating the resource name and its new value.
Wild card (*) settings are also allowed. Therefore to set all widgets called ``Push_me'' width and height you could write:
! Comment: wildcard setting of widget Push_me dimensions

*Push_me.width: 200
*Push_me.height: 300
Motif widget class names may also be used. This will set all widgets of a given class and application to the same values so care should be taken. An alternative method to set the width and height of the PushButton of push.c is to use the Motif XmPushButton class name to set its resources via:
! Comment: Set push application,
! XmPushButton widget class dimensions

Push*XmPushButton.width: 200
Push*XmPushButton.height: 300
The class resource file relates to a particular application, or class of applications. The application class name created with XtVaAppInitialize() is used to associate a class resource file with an application. Thus, the push.c program has an application class ``Push'' and therefore the application would have a class file named Push. The class resource files are normally stored in the user's home directory.
It is possible, and quite practical, to associate several applications with a single class name (by setting the appropriate XtVaAppInitialize() argument) and therefore with a single class resource file. This would allow for one class file to control the resource setting for many usually similar applications. Individual applications can again be referred to by their (compiled) program name, but this is not common.
The setting of individual resource values is as described for the .Xdefaults file, except that the wild card matching may not have such far reaching consequences. Therefore, to set the dimension of the PushButton in push.c we could write:
! Class Resource File for push.c called "Push"
! Store in HOME directory

*Push_me.width: 200
*Push_me.height: 300
Resource values can be set with X window command line parameters. Some common resources can be easily referred to and a general command exists to set any resource value. The advantage of using the command line is that resource values can be altered each time the program is run. This is ideal if you only change a resource infrequently, or you are experimenting to find suitable resource values. However, setting resource values in this fashion regularly involves a lot of typing, so alternative methods should be considered.
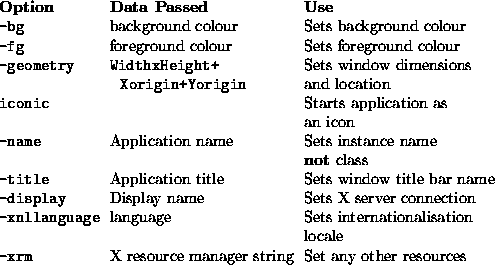
Common resource values have special abbreviations for command line operation. These
are listed in Table. ![]()
The foreground and background colours are referred to by the common colour name database which is detailed in the reference manuals ([Hel94b], Section 18.4). So to set the background to red for the push.c program. We would run the program from the command line as follows:
push -bg red
The -geometry option sets the windows dimension and position. It has 4 parameters:
WidthxHeight+Xorigin+Yorigin
where Width, Height, Xorigin and Yorigin are integer values separated by x or +.
Therefore to set the window size to 300 by 300 with the origin at top left corner run the program from the command line with the following arguments:
push -geometry 300x300+0+0
You can omit either the size, WidthxHeight, or position, +Xorigin+Yorigin parameters in order to either size or position a window.
Therefore to set the window size to 500 by 500 and to allow the window manager to place it somewhere type:
push -geometry 500x500
and to explicitly position a window and use the default dimension type:
push -geometry +100+100
The -xrm option allows the user to set resources that are not otherwise facilitated from the command line. Following the -xrm option you supply a string that contains a resource setting similar to a single line resource value setting in a user or class resource file (including wildcards).
Therefore to change the highlight colour of the PushButton in push.c we could type:
push -xrm "Push*highlightColor: red"
where Push is the application class name and (XmN)highlightColor is the resource being set to red.
Multiple settings of resource values require -xrm calls for each resource value setting. Therefore to set the highlight and foreground colours for the above PushButton we could type:
	push -xrm "Push*highlightColor: red" \
          -xrm "Push*foreground: blue"
The X system provides a program, xrdb, that allow you to set up and edit resources stored on the root window of a display. The data is stored in RESOURCE_MANAGER property and, also, in SCREEN_RESOURCES property if multiple screens are supported. For the sake of simplicity we will assume that we are only working with a single screen and therefore do not need to consider the SCREEN_RESOURCES property further.
When xrdb is run it reads a .Xresources file from which it creates the RESOURCE_MANAGER property. The .Xresources file is usually stored in the users home directory. The .Xresources file can contain similar resource value settings as described for the .Xdefaults file and class resource file. However, xrdb can actually run the .Xresources or an other input file through the C preprocessor, so C preprocessor syntax is allowed in the .Xresources file. Several macros are defined so that constructs like #ifdef and #include may be used. One common example of their use is to set separate colour and monochrome resources for different screen settings. The macro COLOR is defined if a colour screen is present for a given display. Therefore, an .Xresources file could look for this and take appropriate actions:
#ifdef COLOR
! Colour screen detected set colour resources

Push*foreground: RoyalBlue
Push*background: LightSalmon

#else
! must be a monochrome screen

Push*foreground: black
Push*background: white
#endif
For further information on xrdb readers should consult the X Window system user reference manuals[QO90], or online manual documentation.
One advantage of this method of setting resources is that it allows for dynamic changing of defaults without editing files. In fact, the setting of resources via files may not work on X terminals with limited computing power, or when programs are run on multiple machines (since other machines may not have the appropriate .Xdefaults or class resource files). Having all the resource information in the server means that the information is available to all clients.
There are two basic methods for setting resource values from within a C program. The first method described below is dynamic, meaning that resources can be set and altered at any occasion from within the program. Another method allows resources to be set when a widget is created. Both these methods would override other methods of resource setting.
Using this method we can change the values of a resource at any time from within a program. Typically two functions are employed to do this:
Therefore, to set the size of the button resources in push.c we would use XtSetArg() to set width and height values in the arg list and then set the arg values for the button widget as follows:
Arg args[2]; /* Arg array */
int n = 0; /* number arguments */

XtSetArg(args[n], XmNwidth, 500);
n++;
XtSetArg(args[n], XmNwidth, 750);
n++;
XtSetValues(button, args, n);
A related function XtGetValues() exists to find out resource values (Chapters 12 and 14 contain some examples of XtGetValues() in use).
A convenience function XtVaSetValues() actually combines the above two operations and make programming a little less tedious. XtVaSetValues sets the resource value pair for a given widget using a NULL terminated list much like XtVaCreateManagedWidget() (see below).
Therefore, we can achieve the same result as above for setting the button in push.c via:
XtSetValues(button, XmNwidth, 500, XmNwidth, 750, NULL);
We can set resource values at creation. This is common if we wish to permanently override a default resource value. There are a couple of methods we can adopt to achieve this.
We can set an Arg argument list using XtSetArg() as in the previous section and then specify the arg list and the number of arguments in the XmCreate...() function. Therefore, we could amend the push.c program to set the resources at initialisation of the button widget by inserting the following code:
Arg args[2]; /* Arg array */
int n = 0; /* number arguments */

......

XtSetArg(args[n], XmNwidth, 400);
n++;
XtSetArg(args[n], XmNwidth, 600);
n++;

button = XmCreatePushButton(top_wid, "Push_me", args, n);
There is an alternative method which lets us set resource values and create a managed widget in one function call. The function is XtVaCreateManagedWidget() and is a convenient way to program such tasks. Note that this is a general function that can create many different classes of widget. This function is preferred for the creation of widgets due to its uniformity of syntax/structure and its brevity in performing more than one task. Where appropriate all widgets will subsequently be created using this function.
Let us look a the syntax of this function:
Widget XtVaCreateManagedWidget(String name,
               WidgetClass widget_class, Widget parent,
               ... resource name/value pairs ...,
               NULL)
where:
The function returns a widget of the class specified.
Therefore, to create a managed PushButton widget with dimensions 400 by 300 we would type:
button = XtVaCreateManagedWidget("Push_me",
  XmPushButtonWidgetClass, top_wid,
  XmNwidth, 400,
  XmNheight, 200,
  NULL);
Here, XmPushButtonWidgetClass is the class identifier of a PushButton. Other widget types should be fairly obvious.
Fallback resources are used as a mechanism where the specified resource value settings only take effect if all other resource setting methods have failed. Fallback resources are passed as arguments to the XtVaAppInitialize() function (Section 5.6.1). The fallback resources are passed as a NULL terminated list of Strings to this function. Each String specifies a resource value setting similar to those developed for the user and class resource files. Therefore, to set fallback resources for the push.c program we could include the following code:
#include <Xm/Xm.h>
#include <Xm/PushB.h>

/* Define fallback\_resources  */

static String fallback\_resources[] = {
       "*width: 300",
       "*heigth: 400",
       NULL /* NULL termination}
       };

main(int argc, char **argv)
{
    Widget        top_wid, button;
    XtAppContext app;

    top_wid = XtVaAppInitialize(&app,
                  "Push", /* class name */
                   NULL, 0, /* NO command line options table */
                   &argc, argv,  /* command line arguments */
                   fallback\_resources, /* fallback\_resources list */
                   NULL);


     .........
NEED SOME
Most Motif programs will need to employ a combination of many widgets, in order to produce an effective GUI. For example, a text editor application usually requires a combination of buttons, menus, text areas etc.
In this Chapter we will look at how we arrange widgets and furthermore explicitly position widgets within a GUI.
We should now be familiar with the concept of a tree of widgets which is formed by creating widgets with other widgets as parents. When we combine widgets, we simply carry this principle further. Our major concern when combing widgets is to place them in some order and some relative position, with respect to other widgets. Usually we do not want widgets to obscure each other. Care must also be taken with the organisation and positioning of widgets when the window containing the widgets is resized. In particular:
As we shall discover shortly, Motif provides a great deal of flexibility in the behaviour of widgets in such circumstances. The GUI programmer should carefully consider the means of interaction most suitable for the particular application and then select the most appropriate Motif widget and means of organisation to achieve this.
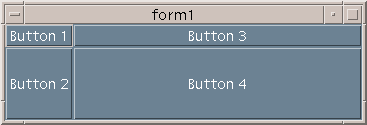
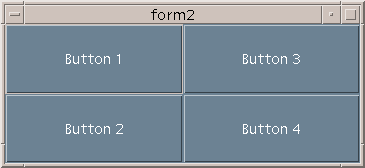
The management of widget geometry is taken care of by certain manager widgets. The RowColumn and Form widgets are the most common widgets used for arranging widgets.
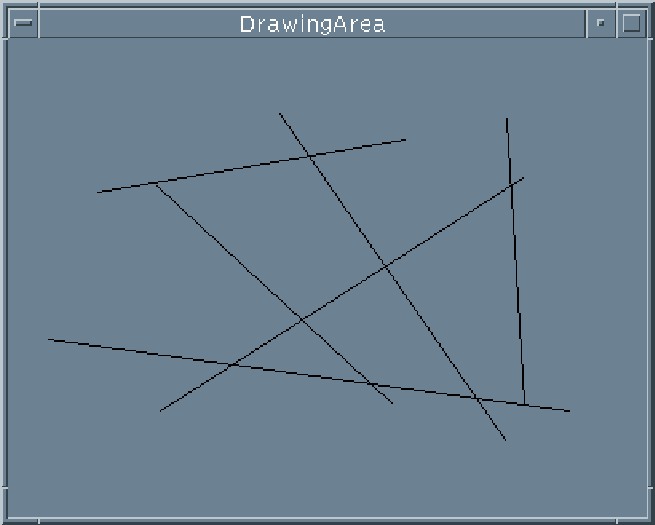
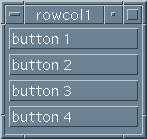
Consider a simple multiple widget program output (Fig 8.1).
Fig. 8.1 Simple Multiple Widget Layout This layout is usually specified by the widget tree structure illustrated in Figure 8.2.
The application shell is still be the top level, below this there would be a RowColumn or Form widget which would contain some primitive widgets (e.g. PushButtons) and define exactly how they are to be positioned relative to each other. Several possible arrangements are available and the format of each depends on the context of the application (e.g. how the widgets are displayed if the window size is increased or decreased).
Fig. 8.2 Multiple Widget Tree We will now consider how we can arrange widgets by considering the RowColumn and Form widgets.
This the simplest widget in terms of how it manages the positioning of its child widgets. Widgets are positioned as follows:
Let us now look at two programs that illustrate the above principles by studying how we achieve the outputs illustrated in Fig. 8.1 (rowcol1.c program) and Fig. 8.3 (rowcol2.c program). As can be seen in these figures, rowcol1.c lays 4 PushButtons vertically (default) whereas rowcol2.c sets the XmNorientation resource for a horizontal layout of the same 4 buttons. The output of the programs are illustrated in Fig 8.3.
Fig. 8.3 RowColumn program output
The rowcol1.c program is as follows:
#include <Xm/PushB.h>
#include <Xm/RowColumn.h>

main(int argc, char **argv)

{
    Widget top_widget, rowcol;
    XtAppContext app;

    top_widget = XtVaAppInitialize(&app, "rowcol", NULL, 0,
        &argc, argv, NULL, NULL);

    rowcol = XtVaCreateManagedWidget("rowcolumn",
        xmRowColumnWidgetClass, top_widget, NULL);

    (void) XtVaCreateManagedWidget("button 1",
        xmPushButtonWidgetClass, rowcol, NULL);

    (void) XtVaCreateManagedWidget("button 2",
        xmPushButtonWidgetClass, rowcol, NULL);

    (void) XtVaCreateManagedWidget("button 3",
        xmPushButtonWidgetClass, rowcol, NULL);

    (void) XtVaCreateManagedWidget("button 4",
        xmPushButtonWidgetClass, rowcol, NULL);

    XtRealizeWidget(top_widget);
    XtAppMainLoop(app);
}
The rowcol1.c program does not really do much. It provides no callback
functions to perform any tasks. It simply creates a RowColumn widget,
rowcol, and creates 4 child buttons with this. Note that rowcol is a
child of app -- the application shell widget. The
<Xm/RowColumn.h> header file must also be included.
The rowcol2.c program is identical to rowcol1.c, except that the
XmNorientation resource is set at the rowcol widget creation with:
rowcol = XtVaCreateManagedWidget("rowcolumn",
                xmRowColumnWidgetClass, top_widget,
                XmNorientation, XmHORIZONTAL,
                NULL);
Forms are the other primary geometry manager widget. They allow more complex handling of positioning of child widgets and can handle widgets of different sizes.
There is more than one way to arrange widgets within a form. We will look at three programs form1.c, form2.c and form3.c that achieve similar results but illustrate different approaches to attaching widgets to forms. All three programs produce initial output illustrated in Fig. 8.4 however if the window is resized, the different attachment policies have a different effect (Figs 8.5, 8.6 and 8.7).
Fig. 8.4 form1.c initial output
Widgets are placed in a form by specifying the attachment of widgets to edges of other widgets. The edges of widgets can either be on the form widget itself, or on other child widgets. Edges are referred to by top, bottom, left and right attachments. A widget has resources, such as XmNtopattachment to attach a widget, to an appropriate edge:
Let us look at how all this works in the form1.c program:
#include <Xm/Xm.h>
#include <Xm/PushB.h>
#include <Xm/Form.h>


main (int argc, char **argv)

{ XtAppContext app;
  Widget   top_wid, form,
	          button1, button2,
           button3, button4;
  int n=0;


  top_wid = XtVaAppInitialize(&app, "Form1",
        NULL, 0, &argc, argv, NULL, NULL);

  /* create form and child buttons */

  form = XtVaCreateManagedWidget("form",
        xmFormWidgetClass, top_wid, NULL);

  button1 = XtVaCreateManagedWidget("Button 1",
      xmPushButtonWidgetClass, form,
      /* attach to top, left of form */
      XmNtopAttachment, XmATTACH_FORM,
      XmNleftAttachment, XmATTACH_FORM,
      NULL);

  button2 = XtVaCreateManagedWidget("Button 2",
      xmPushButtonWidgetClass, form,
      XmNtopAttachment, XmATTACH_WIDGET,
      XmNtopWidget, button1, /* top to button 1 */
      XmNleftAttachment, XmATTACH_FORM, /* left, bottom to form */
      XmNbottomAttachment, XmATTACH_FORM,
      NULL);

  button3 = XtVaCreateManagedWidget("Button 3",
      xmPushButtonWidgetClass, form,
      XmNtopAttachment, XmATTACH_FORM, /* top, right to form */
      XmNrightAttachment, XmATTACH_FORM,
      XmNleftAttachment, XmATTACH_WIDGET, /* left to button 1 */
      XmNleftWidget, button1,
      NULL);

  button4 = XtVaCreateManagedWidget("Button 4",
      xmPushButtonWidgetClass, form,
      XmNbottomAttachment, XmATTACH_FORM, /* bottom right to form */
      XmNrightAttachment, XmATTACH_FORM,
      XmNtopAttachment, XmATTACH_WIDGET,
      XmNtopWidget, button3, /* top to button 3 */
      XmNleftAttachment, XmATTACH_WIDGET,
      XmNleftWidget, button2, /* left to button 2 */
      NULL);
  XtRealizeWidget (top_wid);
  XtAppMainLoop (app);
}
In the above program, the form widget is created as a child of app
and 4 buttons are the children of form. The inclusion of
<Xm/Form.h> header file is always required.
The attachment of the button widgets is as follows:
It is advisable to control the attachment as much as possible, so that any resizing of the form will still preserve the desired order. Fig 8.5 shows the effect of an enlargement of the window produce by the form1.c program. Notice that the relative sizes of individual buttons is not preserved.
Fig. 8.4 form1.c resized window output
We can position the side of a widget to a position in a form. Motif assumes that a form has been partitioned into a number of segments. The position specified is the number of segments from the top left corner.
By default there is assumed to be 100 divisions along the top, bottom, left and
right sides. This can be changed by setting the form resource
XmNfractionBase
The position of a particular side of a widget is set by the widget resource XmNtopAttachment etc. to XmATTACH_POSITION and then setting another resource XmNtopPosition etc. to the appropriate integer value.
The form2.c program specifies the top left of button1 to the edges of the form. The right and bottom edges are attached half way (50 out of a 100 units) along the respective bottom and right edges of the form. The button2, button3 and button4 widgets are positioned similarly.
The complete form2.c program listing is:
#include <Xm/Xm.h>
#include <Xm/PushB.h>
#include <Xm/Form.h>


main (int argc, char **argv)

{ XtAppContext app;
  Widget   top_wid, form,
	          button1, button2,
           button3, button4;
  int n=0;


  top_wid = XtVaAppInitialize(&app, "Form2",
        NULL, 0, &argc, argv, NULL, NULL);

  /* create form and child buttons */

  form = XtVaCreateManagedWidget("form", xmFormWidgetClass,
      top_wid, NULL);

  button1 = XtVaCreateManagedWidget("Button 1",
      xmPushButtonWidgetClass, form,
      /* attach to top, left of form */
      XmNtopAttachment, XmATTACH_FORM,
      XmNleftAttachment, XmATTACH_FORM,
      XmNrightAttachment, XmATTACH_POSITION,
      XmNrightPosition, 50,
      XmNbottomAttachment, XmATTACH_POSITION,
      XmNbottomPosition, 50,
      NULL);


  button2 = XtVaCreateManagedWidget("Button 2",
      xmPushButtonWidgetClass, form,
      XmNbottomAttachment, XmATTACH_FORM,
      XmNleftAttachment, XmATTACH_FORM,
      XmNrightAttachment, XmATTACH_POSITION,
      XmNrightPosition, 50,
      XmNtopAttachment, XmATTACH_POSITION,
      XmNtopPosition, 50,
      NULL);

  button3 = XtVaCreateManagedWidget("Button 3",
      xmPushButtonWidgetClass, form,
      XmNtopAttachment, XmATTACH_FORM,
      XmNrightAttachment, XmATTACH_FORM,
      XmNleftAttachment, XmATTACH_POSITION,
      XmNleftPosition, 50,
      XmNbottomAttachment, XmATTACH_POSITION,
      XmNbottomPosition, 50,
      NULL);


  button4 = XtVaCreateManagedWidget("Button 4",
      xmPushButtonWidgetClass, form,
      XmNbottomAttachment, XmATTACH_FORM,
      XmNrightAttachment, XmATTACH_FORM,
      XmNleftAttachment, XmATTACH_POSITION,
      XmNleftPosition, 50,
      XmNtopAttachment, XmATTACH_POSITION,
      XmNtopPosition, 50,
      NULL);


  XtRealizeWidget (top_wid);
  XtAppMainLoop (app);
}
One effect of this type of widget attachment is that the relative size of component widgets is preserved when the window containing these widgets is resized (Fig 8.6).
Fig. 8.6 form2.c output (resized)
Yet another way to attach widgets is to place an edge opposite edges of another widget. This is achieved by setting the XmNtopAttachment etc. resources to XmATTACH_OPPOSITE_WIDGET. Just as with XmATTACH_WIDGET, a widget has to be associated with the XmNwidget resource.
With the opposite form of attachment ``similar'' edges are attached. In the form3.c program we attach the right edge of button2 to the right edge of button1, the left edge of button3 with the left of button1 and so on.
The complete form3.c program listing is:
#include <Xm/Xm.h>
#include <Xm/PushB.h>
#include <Xm/Form.h>


main (int argc, char **argv)

{ XtAppContext app;
  Widget   top_wid, form,
	          button1, button2,
           button3, button4;
  int n=0;


  top_wid = XtVaAppInitialize(&app, "Form3",
        NULL, 0, &argc, argv, NULL, NULL);

  /* create form and child buttons */

  form = XtVaCreateManagedWidget("form", xmFormWidgetClass,
      top_wid, NULL);

  button1 = XtVaCreateManagedWidget("Button 1",
      xmPushButtonWidgetClass, form,
      /* attach to top, left of form */
      XmNtopAttachment, XmATTACH_FORM,
      XmNleftAttachment, XmATTACH_FORM,
      NULL);


  button2 = XtVaCreateManagedWidget("Button 2",
      xmPushButtonWidgetClass, form,
      XmNtopAttachment, XmATTACH_WIDGET,
      XmNtopWidget, button1,
      XmNleftAttachment, XmATTACH_FORM,
      XmNbottomAttachment, XmATTACH_FORM,
      XmNrightAttachment, XmATTACH_OPPOSITE_WIDGET,
      XmNrightWidget, button1,
      NULL);

  button3 = XtVaCreateManagedWidget("Button 3",
      xmPushButtonWidgetClass, form,
      XmNtopAttachment, XmATTACH_FORM,
      XmNrightAttachment, XmATTACH_FORM,
      XmNleftAttachment, XmATTACH_WIDGET,
      XmNleftWidget, button1,
      NULL);


  button4 = XtVaCreateManagedWidget("Button 4",
      xmPushButtonWidgetClass, form,
      XmNbottomAttachment, XmATTACH_FORM,
      XmNrightAttachment, XmATTACH_FORM,
      XmNtopAttachment, XmATTACH_WIDGET,
      XmNtopWidget, button3,
      XmNleftAttachment, XmATTACH_OPPOSITE_WIDGET,
      XmNleftWidget, button3,
      NULL);


  XtRealizeWidget (top_wid);
  XtAppMainLoop (app);
}
The relative sizing of widgets within the window is not guaranteed to be
preserved, as in form1.c (Fig 8.7). However this method of
layout is sometimes a natural way to express the configuration of the widgets.
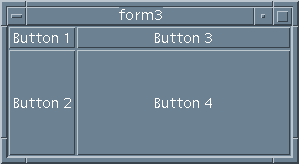
Fig. 8.7 form3.c output (resized)
Let us finish off this section by building a Form widget that contains two different types of widget. It will also use callback functions thus making a more complete application program example.
The program is called arrows.c. It creates 4 ArrowButton widgets arranged in a north, south, east and west type arrangement. In the middle of the 4 ArrowButtons is a PushButton, labelled ``Quit''. The output of arrows.c is shown in Fig. 8.8.
Fig. 8.8 arrows.c output
The program listing is:
#include <Xm/Xm.h>
#include <Xm/PushB.h>
#include <Xm/ArrowB.h>
#include <Xm/Form.h>

/* Prototype callback fns */
void north(Widget , XtPointer ,
	          XmPushButtonCallbackStruct *),
     south(Widget , XtPointer ,
	          XmPushButtonCallbackStruct *),
     east(Widget , XtPointer ,
	          XmPushButtonCallbackStruct *),
     west(Widget , XtPointer ,
	          XmPushButtonCallbackStruct *),
     quitb(Widget , XtPointer ,
	          XmPushButtonCallbackStruct *);


main(int argc, char **argv)

{
    XtAppContext app;
    Widget top_wid, form,
           arrow1, arrow2,
           arrow3, arrow4,
           quit;

    top_wid = XtVaAppInitialize(&app, "Multi Widgets",
                 NULL, 0, &argc, argv, NULL, NULL);


    form = XtVaCreateWidget("form", xmFormWidgetClass, top_wid,
                 XmNfractionBase,     3,
	                NULL);

    arrow1 = XtVaCreateManagedWidget("arrow1",
	                xmArrowButtonWidgetClass, form,
	                XmNtopAttachment,    XmATTACH_POSITION,
	                XmNtopPosition,      0,
	                XmNbottomAttachment, XmATTACH_POSITION,
	                XmNbottomPosition,   1,
	                XmNleftAttachment,   XmATTACH_POSITION,
	                XmNleftPosition,     1,
	                XmNrightAttachment,   XmATTACH_POSITION,
	                XmNrightPosition,    2,
	                XmNarrowDirection,   XmARROW_UP,
	                NULL);

    arrow2 = XtVaCreateManagedWidget("arrow2",
	                xmArrowButtonWidgetClass, form,
	                XmNtopAttachment,    XmATTACH_POSITION,
	                XmNtopPosition,      1,
	                XmNbottomAttachment, XmATTACH_POSITION,
	                XmNbottomPosition,   2,
	                XmNleftAttachment,   XmATTACH_POSITION,
	                XmNleftPosition,     0,
	                XmNrightAttachment,   XmATTACH_POSITION,
	                XmNrightPosition,    1,
	                XmNarrowDirection,   XmARROW_LEFT,
	                NULL);

    arrow3 = XtVaCreateManagedWidget("arrow3",
	                xmArrowButtonWidgetClass, form,
	                XmNtopAttachment,    XmATTACH_POSITION,
	                XmNtopPosition,      1,
	                XmNbottomAttachment, XmATTACH_POSITION,
	                XmNbottomPosition,   2,
	                XmNleftAttachment,   XmATTACH_POSITION,
	                XmNleftPosition,     2,
	                XmNrightAttachment,   XmATTACH_POSITION,
	                XmNrightPosition,    3,
	                XmNarrowDirection,   XmARROW_RIGHT,
	                NULL);

   arrow4 = XtVaCreateManagedWidget("arrow4",
	                xmArrowButtonWidgetClass, form,
	                XmNtopAttachment,    XmATTACH_POSITION,
	                XmNtopPosition,      2,
	                XmNbottomAttachment, XmATTACH_POSITION,
	                XmNbottomPosition,   3,
	                XmNleftAttachment,   XmATTACH_POSITION,
	                XmNleftPosition,     1,
	                XmNrightAttachment,   XmATTACH_POSITION,
	                XmNrightPosition,    2,
	                XmNarrowDirection,   XmARROW_DOWN,
	                NULL);

   quit =XtVaCreateManagedWidget("Quit",
	                xmPushButtonWidgetClass, form,
	                XmNtopAttachment,    XmATTACH_POSITION,
	                XmNtopPosition,      1,
	                XmNbottomAttachment, XmATTACH_POSITION,
	                XmNbottomPosition,   2,
	                XmNleftAttachment,   XmATTACH_POSITION,
	                XmNleftPosition,     1,
	                XmNrightAttachment,   XmATTACH_POSITION,
	                XmNrightPosition,    2,
	                NULL);

    /* add callback functions */

    XtAddCallback(arrow1, XmNactivateCallback, north, NULL);
    XtAddCallback(arrow2, XmNactivateCallback, west, NULL);
    XtAddCallback(arrow3, XmNactivateCallback, east, NULL);
    XtAddCallback(arrow4, XmNactivateCallback, south, NULL);
    XtAddCallback(quit, XmNactivateCallback, quitb, NULL);

    XtManageChild(form);
    XtRealizeWidget(top_wid);
    XtAppMainLoop(app); }


    /* CALLBACKS */

void north(Widget w, XtPointer client_data,
	          XmPushButtonCallbackStruct *cbs)

    { printf("Going North\n");
    }

void west(Widget w, XtPointer client_data,
	         XmPushButtonCallbackStruct *cbs)

    { printf("Going West\n");
    }

void east(Widget w, XtPointer client_data,
	         XmPushButtonCallbackStruct *cbs)

    { printf("Going East\n");
    }

void south(Widget w, XtPointer client_data,
	          XmPushButtonCallbackStruct *cbs)

    { printf("Going South\n");
    }

void quitb(Widget w, XtPointer client_data,
	          XmPushButtonCallbackStruct *cbs)

    { printf("quit button pressed\n");
      exit(0);
    }
The arrows.c program uses the fraction base positioning method of placing widgets within a form:
NEED SOME
When designing a GUI, care must be taken in the presentation of the application's primary window. This window is important as it is likely to be the major focus of the application -- the most visible and most used window in the application. In order to facilitate consistency amongst many different applications, Motif provides a general framework: the MainWindow Widget, for an application developer to work with. The Motif Style Guide (Chapter 20) recommends that, whenever applicable, the MainWindow window should be used. It should be noted, however, that the general framework of the MainWindow is not always applicable to every application front end GUI. A text editor application front end is an example that might easily map into the MainWindow framework, a simple calculator application most certainly would not fit the prescribed framework.
A MainWindow widget can manage up to five specialised child widgets (Fig 9.1):
Fig. 9.1 The MainWindow Widget with its Specialised Child Widgets
The MainWindow basically provides an efficient method of managing widgets as recommended by the Motif Style Guide (Chapter 20). In particular, the provision of a menu bar and work area is a convenient mechanism with which to drive many applications. It should be noted that the work area can be any widget (or composite hierarchy of widgets). The scrollbars, command and message area are optional.
In this Chapter, we will mainly concentrate our study on the relationship between the MainWindow and certain types of menus. We will also see how to put widgets in the work area MainWindow. We will see further applications of the MainWindow widget in the remainder of the book. The MainWindow will be used as a container widget in many example programs throughout the book.
As we have previously stated, the MainWindow is typically used as the top level container for an application's child widgets. The simplest functional MainWindow may consist of a menu bar along the top of the application and some work area below, this is illustrated in Fig. 9.2. We omit the scroll bars and command and message areas for the time being.
Fig. 9.2 menu_cascade.c output
Menu bar items are placed within the menu bar . You can use menu bar items to perform selections directly. However, more usually a PullDown menu is attached to a menu bar item allowing greater selection opportunities.
The function of the work area is to perform the main application's functions. The work area can be any widget class. We will look at aspects of this in later sections when we have studied more widget classes.
Initially, we will concentrate on how to create menus in a MainWindow.
The creation of a fully functional pulldown MenuBar typical of most MainWindow based applications is fairly complex. We will, therefore, break it down into two stages.
A MenuBar widget is really a RowColumn widget under another name. The way we
create a MenuBar is to use one of the (several) XmCreate![]() or
XtVaCreate
or
XtVaCreate![]() Menu options. For most of our applications, we will use the
XmCreateMenuBar() function.
Menu options. For most of our applications, we will use the
XmCreateMenuBar() function.
Having created a MenuBar we create MenuBar items by attaching widgets to the MenuBar in exactly the same fashion as described for the RowColumn widget (Chapter 8). The widgets we usually attach are CascadeButton widgets since we can hang pull down menus off these widgets.
Fig. 9.2 shows the output of the menu_cascade.c program that simply creates a simple MenuBar widget and attaches two CascadeButton widgets - help and quit. Minimal callback functions are associated with each CascadeButton.
The full program listing of menu_cascade.c is:
#include <Xm/Xm.h>
#include <Xm/MainW.h>
#include <Xm/CascadeB.h>

/* Prototype callbacks */
void quit_call(void), help_call(void);

main(int argc, char **argv)

{
    Widget top_wid, main_w, menu_bar, quit, help;
    XtAppContext app;
    Arg arg[1];

    /* create application, main and menubar widgets */

    top_wid = XtVaAppInitialize(&app, "menu_cascade",
        NULL, 0, &argc, argv, NULL, NULL);

    main_w = XtVaCreateManagedWidget("main_window",
        xmMainWindowWidgetClass,   top_wid,
        NULL);

    menu_bar = XmCreateMenuBar(main_w, "main_list",
        NULL, 0);
    XtManageChild(menu_bar);


     /* create quit widget + callback */

    quit = XtVaCreateManagedWidget( "Quit",
        xmCascadeButtonWidgetClass, menu_bar,
        XmNmnemonic, 'Q',
        NULL);


    XtAddCallback(quit, XmNactivateCallback, quit_call, NULL);

    /* create help widget + callback */

    help = XtVaCreateManagedWidget( "Help",
        xmCascadeButtonWidgetClass, menu_bar,
        XmNmnemonic, 'H',
        NULL);


    XtAddCallback(help, XmNactivateCallback, help_call, NULL);

    /* Tell the menubar which button is the help menu  */

    XtSetArg(arg[0],XmNmenuHelpWidget,help);
    XtSetValues(menu_bar,arg,1);


    XtRealizeWidget(top_wid);
    XtAppMainLoop(app);
}


void quit_call()

{   printf("Quitting program\n");
    exit(0);
}

void help_call()

{   printf("Sorry, I'm Not Much Help\n");
}
The first steps of the main function should now be familiar -- we initialise the application and create the top_wid top level widget.
A MainWindow widget , main_win, is then created as is a MenuBar , menu_bar. The menu_bar widget is a child of main_win. Finally, we attach two CascadeButton widgets, quit and help, as children of menu_bar. Note there is no work area created in this program.
A CascadeButton widget is usually used to attach a pulldown menu to the MenuBar. This CascadeButton widget is similar to the PushButton widget and can have callback functions attached to its activateCallback function -- illustrated in the menu_cascade.c program. However, it should be noted, that the main use of CascadeButton is to link a menu bar with a menu.
The program above simply attaches callback functions to the CascadeButtons. The callback functions do not do much except quit the program and print to standard output.
You can also associate a mnemonic to a particular menu selection. This means that you can use ``hot keys'' on the keyboard as a short cut to selection. You need to press Meta key plus the key in question.
In this program, we allow Meta-Q and Meta-H for the selection of Quit and Help. Note that Motif displays the appropriate Meta key by underlining the letter concerned on the menu bar (or menu item). The XmNmnemonic resource is used to select the appropriate keyboard short cut.
Apart from prescribing the use of the Meta key for the selection of menu items, the Motif Style Guide also insists that the Help MenuBar widget should always be placed on the right most side of the MenuBar (Fig. 9.2). This makes for easy location and selection of the help facility, should it exist.
The MenuBar resource, XmNmenuHelpWidget , is used to store the ID of the the appropriate widget (help in the above program).
Let us now develop things a little further by adding pulldown menus to our MenuBar. A pulldown menu looks like this:
Fig. 9.3 menu_pull.c output
In order to see how we create and use pulldown menu items we will develop a program, menu_pull.c that will create two pulldown menus:
We also attach the Help Cascade button as in the previous menu_cascade.c program.
We should now be familiar with the first few steps of this program: We create the top level widget hierarchy as usual, with the MainWindow widget being a child of the application and a MenuBar widget a child of the MainWindow.
The complete listing of menu_pull.c is as follows:
#include <Xm/Xm.h>
#include <Xm/MainW.h>
#include <Xm/CascadeB.h>
#include <Xm/Label.h>

/* prototype functions */

void quit_call(Widget , int),
       menu_call(Widget , int),
       help_call(void);


Widget label;
String food[] = { "Chicken",  "Beef", "Pork", "Lamb", "Cheese"};


main(int argc, char **argv)

{   Widget top_wid, main_w, help;
    Widget  menubar, menu, widget;
    XtAppContext app;
    XColor back, fore, spare;
    XmString  quit, menu_str,  help_str, chicken, beef, pork,
              lamb, cheese, label_str;

    int n = 0;
    Arg args[2];

    /* Initialize toolkit */
    top_wid = XtVaAppInitialize(&app, "Demos",
        NULL, 0, &argc, argv, NULL, NULL);


    /* main window will contain a MenuBar and a Label  */
    main_w = XtVaCreateManagedWidget("main_window",
        xmMainWindowWidgetClass,   top_wid,
        XmNwidth, 300,
        XmNheight, 300,
        NULL);

    /* Create a simple MenuBar that contains three menus */
    quit = XmStringCreateLocalized("Quit");
    menu_str = XmStringCreateLocalized("Menu");
    help_str = XmStringCreateLocalized("Help");


    menubar = XmVaCreateSimpleMenuBar(main_w, "menubar",
        XmVaCASCADEBUTTON, quit, 'Q',
        XmVaCASCADEBUTTON, menu_str, 'M',
        XmVaCASCADEBUTTON, help_str, 'H',
        NULL);


    XmStringFree(menu_str); /* finished with this so free */
    XmStringFree(help_str);

    /* First menu is the quit menu -- callback is quit_call() */

    XmVaCreateSimplePulldownMenu(menubar, "quit_menu", 0, quit_call,
        XmVaPUSHBUTTON, quit, 'Q', NULL, NULL,
        NULL);
    XmStringFree(quit);

    /* Second menu is the food menu -- callback is menu_call() */
    chicken = XmStringCreateLocalized(food[0]);
    beef = XmStringCreateLocalized(food[1]);
    pork = XmStringCreateLocalized(food[2]);
    lamb = XmStringCreateLocalized(food[3]);
    cheese = XmStringCreateLocalized(food[4]);

    menu = XmVaCreateSimplePulldownMenu(menubar, "edit_menu", 1,
        menu_call,
        XmVaRADIOBUTTON, chicken, 'C', NULL, NULL,
        XmVaRADIOBUTTON, beef, 'B', NULL, NULL,
        XmVaRADIOBUTTON, pork, 'P', NULL, NULL,
        XmVaRADIOBUTTON, lamb, 'L', NULL, NULL,
        XmVaRADIOBUTTON, cheese, 'h', NULL, NULL,
        /* RowColumn resources to enforce */
        XmNradioBehavior, True,
        /* select radio behavior in Menu */
        XmNradioAlwaysOne, True,
        NULL);
    XmStringFree(chicken);
    XmStringFree(beef);
    XmStringFree(pork);
    XmStringFree(lamb);
    XmStringFree(cheese);


    /* Initialize menu so that "chicken" is selected. */
    if (widget = XtNameToWidget(menu, "button_1"))
       { XtSetArg(args[n],XmNset, True);
         n++;
         XtSetValues(widget, args, n);
       }

    n=0; /* reset n */

     /* get help widget ID to add callback */

    help = XtVaCreateManagedWidget( "Help",
        xmCascadeButtonWidgetClass, menubar,
        XmNmnemonic, 'H',
        NULL);

    XtAddCallback(help, XmNactivateCallback, help_call, NULL);

     /* Tell the menubar which button is the help menu  */

     XtSetArg(args[n],XmNmenuHelpWidget,help);
     n++;
     XtSetValues(menubar,args,n);
     n=0; /* reset n */


    XtManageChild(menubar);

   /* create a label text widget that will be "work area"
      selections from "Menu"  menu change label
      default label is item 0 */

    label_str = XmStringCreateLocalized(food[0]);

    label = XtVaCreateManagedWidget("main_window",
        xmLabelWidgetClass,   main_w,
        XmNlabelString, label_str,
        NULL);

     XmStringFree(label_str);

    /* set the label as the "work area" of the main window */
    XtVaSetValues(main_w,
        XmNmenuBar,    menubar,
        XmNworkWindow, label,
        NULL);


    XtRealizeWidget(top_wid);
    XtAppMainLoop(app);
}

/* Any item the user selects from the File menu calls this function.
   It will "Quit" (item_no == 0).  */

void
quit_call(Widget w, int item_no)

   /* w = menu item that was selected
      item_no = the index into the menu */

{


    if (item_no == 0) /* the "quit" item */
        exit(0);

   }


/* Called from any of the food "Menu" items.
   Change the XmNlabelString of the label widget.
   Note: we have to use dynamic setting with setargs().
 */

void  menu_call(Widget w, int item_no)


{
    int n =0;
    Arg args[1];

    XmString   label_str;

    label_str = XmStringCreateLocalized(food[item_no]);

    XtSetArg(args[n],XmNlabelString, label_str);
    ++n;
    XtSetValues(label, args, n);

}


void help_call()

{   printf("Sorry, I'm Not Much Help\n");
}
In this program we create the MenuBar widget with the convenience function XmVaCreateSimpleMenuBar() :
In menu_pull.c, we set up two
CascadeButtons![]() by setting the
by setting the
XmVACASCADEBUTTON resource. Two arguments are
associated with this resource:
Note: we convert a String to an XmString with the
XmStringCreateLocalized() function.
It is good practice to free an XmString as soon as you have finished using it with the XmStringFree() command. Several ``open'' XmStrings can occupy a significant amount of application memory.
The creation of a pulldown menu is now relatively straightforward:
Let us now look at how we create the Quit menu:
quit_w = XmVaCreateSimplePulldownMenu(menubar, "quit_menu",
             0, quit_call,
             XmVaPUSHBUTTON, quit, 'Q', NULL, NULL,
             NULL);
We have used the Motif convenience function XmVaCreateSimplePulldownMenu() to return a PulldownMenu widget. This function has several arguments:
Thus, in this program an integer ID of 0 is attached to the Quit button and an ID of 1 would be attached to the Menu button.
Note: We do not specify a callback with an XtAddCallback() call in this instance.
To specify a PushButton menu item, set a XmVaPUSHBUTTON resource list item and corresponding XmString label and Meta key accordingly for the list entry. XmVaPUSHBUTTON actually takes four arguments, the last two are only needed for advanced Motif use, so are not considered here -- they are just set to NULL.
The Menu menu is created in a similar way except that we have 5 menu items.
We may have one, minor, problem when assigning Meta keys. This is illustrated for the Menu items since we cannot have the same Meta key for two menu selections. So Meta-B is chosen for Beef and Meta-L for Lamb, etc. However, Chicken and Cheese must be assigned different Meta keys, so we allocate Meta-C for Chicken and Meta-h for cheese selections.
The last thing we need to look at is how we find out which selection has been made in our program.
Each PulldownMenu has an associated callback function . The callback function of a pulldown has two parameters, which we must define.
So, in the Quit callback, quit_call(), we only have one possible selection (item_no must equal zero).
In the Menu callback, menu_call(), the index corresponds to a food item
setting of Chicken, Beef, ![]() etc..
etc..
Chapter 20 discusses aspects of the Motif Style guidelines for menus which also incorporate some general menu design issues.
Tear-off menus allow the user to remove (or tear) a menu off the MenuBar and keep it displayed in a small dialog window (Figs. 9.4 and 9.5) on the screen until the user closes it from the window menu. The Motif Style Guide (Chapter 20) prescribes this for menus that are frequently used in order to ease menu selection In order to make a menu a tear-off variety the XmNtearOffModel resource for a PullDownMenu widget needs to set to XmTEAR_OFF_ENABLED. If a menu is XmTEAR_OFF_ENABLED then its appearance is modified to include a small perforated line at the top of the menu (Fig. 9.4).
Fig. 9.4 A Tear-off Menu on the MenuBar

Fig. 9.5 A Tear-off Menu Dialog
TextField, Label or Command widgets are typically employed as the command and message areas.
Fig. 9.6 The test_for_echo.c program output The test_for_echo.c program achieves this by:
The complete program listing for test_for_echo.c is as follows:
#include <Xm/MainW.h>
#include <Xm/Label.h>
#include <Xm/Command.h>
#include <Xm/TextF.h>

#include <stdio.h>
#include <string.h> /* For String Handling */

#define MAX_STR_LEN 30 /* Max Char length of Text Field */

/* Callback function prototypes */

void   cmd_cbk(), quit_cbk();

Widget   msg_wid;

char *cmd_label  = "Command Area: ";
char *msg_label  =  "Message Area: ";

int cmd_label_length;
int msg_label_length;


main(int argc,  char **argv)

{
    Widget        top_wid, main_win, menubar, menu,
                  label, cmd_wid;
    XtAppContext  app;
    XmString      label_str, quit;

    cmd_label_length = strlen(cmd_label);
    msg_label_length = strlen(msg_label);

    /* initialize toolkit and create top_widlevel shell */
    top_wid = XtVaAppInitialize(&app, "Main Window",
        NULL, 0, &argc, argv, NULL, NULL);


    /* Create MainWindow */

   main_win = XtVaCreateWidget("main_w",
        xmMainWindowWidgetClass, top_wid,
        XmNcommandWindowLocation, XmCOMMAND_BELOW_WORKSPACE,
        NULL);

    /* Create a simple MenuBar that contains one menu */
    quit = XmStringCreateLocalized("Quit");
    menubar = XmVaCreateSimpleMenuBar(main_win, "menubar",
        XmVaCASCADEBUTTON, quit, 'Q',
        NULL);


    menu = XmVaCreateSimplePulldownMenu(menubar, "file_menu", 0,
        quit_cbk,
        XmVaPUSHBUTTON, quit, 'Q', NULL, NULL,
        NULL);

    XmStringFree(quit);

    /*  Manage Menubar */

    XtManageChild(menubar);

    /* create a label text widget that wil be work area  */
    label_str = XmStringCreateLocalized("Work Area");

    label = XtVaCreateManagedWidget("main_window",
        xmLabelWidgetClass,   main_win,
        XmNlabelString, label_str,
        XmNwidth, 1000,
        XmNheight, 800,
        NULL);

     XmStringFree(label_str);


    /* Create the command area  */


    cmd_wid = XtVaCreateWidget(  "Command",
        xmTextFieldWidgetClass,  main_win,
        XmNmaxLength, MAX_STR_LEN,
       NULL);


    XmTextSetString(cmd_wid,cmd_label);
    XmTextSetInsertionPosition(cmd_wid, cmd_label_length);

    XtAddCallback(cmd_wid, XmNactivateCallback, cmd_cbk);

    XtManageChild(cmd_wid);


 /* Create the message area  */

    msg_wid= XtVaCreateWidget(  "Message:",
        xmTextFieldWidgetClass,   main_win,
        XmNeditable, False,
        XmNmaxLength, MAX_STR_LEN,
        NULL);

    XmTextSetString(msg_wid,msg_label);

    XtManageChild(msg_wid);

/* set the label as the work, command and message areas
   of the main window */

    XtVaSetValues(main_win,
        XmNmenuBar,    menubar,
        XmNworkWindow, label,
        XmNcommandWindow, cmd_wid,
        XmNmessageWindow,msg_wid,
        NULL);

    XtManageChild(main_win);
    XtRealizeWidget(top_wid);
    XtAppMainLoop(app);
}

/* execute the command and redirect message area */

void cmd_cbk(Widget cmd_widget, XtPointer *client_data,
            XmAnyCallbackStruct  *cbs)
{
    char cmd[MAX_STR_LEN],msg[MAX_STR_LEN];

    XmTextGetSubstring(cmd_widget,cmd_label_length,
            MAX_STR_LEN - cmd_label_length, MAX_STR_LEN ,cmd);

    /* Append input message to Message area */

    XmTextReplace(msg_wid,msg_label_length, MAX_STR_LEN,cmd);

    /* Reset Command Area label  and insertion point*/

    XmTextSetString(cmd_widget, cmd_label);
    XmTextSetInsertionPosition(cmd_widget, cmd_label_length);
}

void  quit_cbk(Widget w, int item_no)

{    if (item_no == 0) /* the "quit" item */
        exit(0);
}
NEEDS SOME
Any application needs to interact with the user. At the simplest level an application may need to inform, alert or warn the user about its current state. More advanced interaction may require the user to select or input data. Selecting files from a directory/file selection window is typical of an advanced example. Clearly, the provision of such interaction is the concern of the GUI. Motif provides a variety of Dialog widgets or Dialogs that facilitate most common user interaction requirements.
Motif Dialog widgets usually comprise of the following components:
More advanced Dialogs (e.g. selection dialogs) may significantly enhance this model.
Dialogs have many distinct uses, indeed the Motif Style Guide [Ope93] (Chapter 20) is specific in the use of each Dialog . The following Dialogs are provided by Motif:
To create a Dialog use one of the XmCreate.....Dialog() functions.
Dialogs do not usually appear immediately on screen after creation or when the the initial application GUI is realized. Indeed, if an application runs successfully certain Dialog widgets (Error or Warning Dialogs, in particular) may never be required. However, prudent applications should consider all practical avenues that an application would be expected to take and provide suitable information (via Dialogs) to the user.
It is advisable to create all Dialogs when the application is initialised and the overall GUI is setup. However, Dialogs will not be managed initially. Recall Section 5.7) when a widget is unmanaged by its parent it will always be invisible.
Therefore, Dialogs are usually created unmanaged and displayed when required in the program as described below:
This method has the advantage that we only need to create a Dialog once and can then manage or unmanage it when necessary.
Most Motif Dialogs have default callback resources attached to the common Ok and Cancel. One consequence of these default callbacks is that they will unmanage the widgets from which they were called. However, if the application provides alternative callback (or other) functions then responsibility for correctly managing and unmanaging them is given over to the programmer.
The use of many dialogs is very similar. We will study a few specific Dialogs in detail.
This dialog is used to inform the user of a possible mistake in the program or in interaction with the program.
A typical example might be when you select the quit button (or menu item) to terminate the program -- if this was selected mistakenly, and there is no warning prompt, you have problems.
The dialog1.c (Section 10.5) program attaches a pop-up WarningDialog when the quit menu option is selected (Fig 10.1). If you now select OK the program terminates, Cancel returns back to the program.
Fig. 10.1 WarningDialog and InformationDialog
Widgets
The function create_dialogs() in dialog1.c creates the WarningDialog in the following typical manner:
The callback function quit_pop_up() simply needs to XtManageChild() the given Dialog widget so that it is displayed as required by the application.
The InformationDialog Widget is essentially the same as the WarningDialog, except that InformationDialogs are intended to supply program information or help. In terms of Motif creation and management the widgets are identical except that the XmCreateInformationDialog() is used to create this class of Dialog. The main difference between the widgets to the user is visual. Motif employs different icons to distinguish between the two (Fig 10.1).
The program dialog1.c illustrates the creation and use of an InformationDialog Widget.
<Xm/MessageB.h> header file.
#include <Xm/Xm.h>
#include <Xm/MainW.h>
#include <Xm/CascadeB.h>
#include <Xm/MessageB.h>
#include <Xm/PushB.h>

/* Prototype functions */

void create_dialogs(void);

/* callback for the pushbuttons.  pops up dialog */

void info_pop_up(Widget , char *, XmPushButtonCallbackStruct *),
       quit_pop_up(Widget , char *, XmPushButtonCallbackStruct *);

void info_activate(Widget ),
       quit_activate(Widget );

/* Global reference for dialog widgets */
Widget info, quit;
Widget info_dialog, quit_dialog;


main(int argc, char *argv[])
{
    XtAppContext app;
    Widget top_wid, main_w, menu_bar;

    top_wid = XtVaAppInitialize(&app, "Demos", NULL, 0,
        &argc, argv, NULL, NULL);

    main_w = XtVaCreateManagedWidget("main_window",
        xmMainWindowWidgetClass,   top_wid,
        XmNheight, 300,
        XmNwidth,300,
        NULL);


    menu_bar = (Widget) XmCreateMenuBar(main_w, "main_list", NULL, 0);
    XtManageChild(menu_bar);


    /* create quit widget + callback */

    quit = XtVaCreateManagedWidget( "Quit",
        xmCascadeButtonWidgetClass, menu_bar,
        XmNmnemonic, 'Q',
        NULL);

    /* Callback has data passed to */

    XtAddCallback(quit, XmNactivateCallback, quit_pop_up, NULL);


    /* create help widget + callback */

    info = XtVaCreateManagedWidget( "Info",
        xmCascadeButtonWidgetClass, menu_bar,
        XmNmnemonic, 'I',
        NULL);

    XtAddCallback(info, XmNactivateCallback, info_pop_up, NULL);


    /* Create but do not show (manage) dialogs */

    create_dialogs();


    XtRealizeWidget(top_wid);
    XtAppMainLoop(app);
}

void create_dialogs()

 {  /* Create but do not manage dialog widgets */

    XmString xm_string;
    Arg args[1];


    /* Create InformationDialog */

    /* Label the dialog */

    xm_string = XmStringCreateLocalized("Dialog widgets added to \
                give info and check quit choice");
    XtSetArg(args[0], XmNmessageString, xm_string);

    /* Create the InformationDialog */

    info_dialog = XmCreateInformationDialog(info, "info", args, 1);

    XmStringFree(xm_string);

    XtAddCallback(info_dialog, XmNokCallback, info_activate, NULL);

    /* Create Warning DIalog */

    /* label the dialog */

    xm_string =
      XmStringCreateLocalized("Are you sure you want to quit?");
    XtSetArg(args[0], XmNmessageString, xm_string);

    /* Create the WarningDialog */
    quit_dialog = XmCreateWarningDialog(quit, "quit", args, 1);

    XmStringFree(xm_string);

    XtAddCallback(quit_dialog, XmNokCallback, quit_activate, NULL);

}


void info_pop_up(Widget cascade_button, char *text,
                 XmPushButtonCallbackStruct *cbs)

{
    XtManageChild(info_dialog);
}

void quit_pop_up(Widget cascade_button, char *text,
                 XmPushButtonCallbackStruct *cbs)

{
    XtManageChild(quit_dialog);
}

/* callback routines for dialogs */

void info_activate(Widget dialog)
{
    printf("Info Ok was pressed.\n");
}

void quit_activate(Widget dialog)
{
    printf("Quit Ok was pressed.\n");
    exit(0);
}
These 3 Dialogs are similar to both the Information and Warning Dialogs. They are created and used in similar fashions. The main difference again being the icon used to depict the Dialog class as illustrated in Figs. 10.2 -- 10.4.
Fig. ![]() QuestionDialog Widget
QuestionDialog Widget
When you create a Dialog, Motif will create 3 buttons by default -- Ok, Cancel and Help. There are many occasions when it is not natural to require the use of three buttons within an application. For instance in dialog1.c we only really need the user to acknowledge the InformationDialog and no user should need any help to choose whether to quit our program.
Motif provides a mechanism to disable unwanted buttons in a Dialog.
To remove a button:
An example where we disable the Cancel and Help buttons on the InformationDialog and the Help button on the WarningDialog from the Dialogs created in program dialog1.c is shown in Fig. 10.5. The code that performs the task of deleting the Help from a widget, dialog is as follows:
   Widget remove;

   remove = XmMessageBoxGetChild(dialog, XmDIALOG_HELP_BUTTON);

   XtUnmanageChild(remove);
Fig. 10.5 Removed Dialog Button
The PromptDialog widget is slightly more advanced than the classes of Dialog widgets encountered so far. This widget allows the user to enter text (Fig. 10.6).
The function XmCreatePromptDialog() instantiates the Dialog. Typically two resources of a PromptDialog widget are required to be set. These resources are
Note: A Prompt Dialog is based on the SelectionBox widget and so we must
include <Xm/SelectioB.h> header file.
This program, an extension of dialog1.c, creates a PromptDialog into which the user can enter text. The PromptDialog first displayed by this program is shown in Fig. 10.6. The text is echoed in an InformationDialog which is created in a Prompt callback function, prompt_activate().
Fig. 10.6 PromptDialog Widget
A PromptDialog Callback has the following structure
 void prompt_callback(Widget widget, XtPointer client_data,
XmSelectionBoxCallbackStruct *selection)
Normally, we will only be interested in obtaining the string entered to the PromptDialog. An element of the XmSelectionBoxCallbackStruct, value holds the (XmString data type) value.
In prompt.c, the callback for the prompt dialog (activated with Ok button) -- prompt_activate().
This function uses the selection->value XmString to set up the
InformationDialog message String.
Note, that since a PromptDialog is a SelectionBox widget type we must use XmSelectionBoxGetChild() to find any buttons we may wish to remove from the PromptDialog. In prompt.c we remove the Help button in this way.
#include <Xm/Xm.h>
#include <Xm/MainW.h>
#include <Xm/CascadeB.h>
#include <Xm/MessageB.h>
#include <Xm/PushB.h>
#include <Xm/SelectioB.h>

/* Callback and other function prototypes */

void ScrubDial(Widget, int);
void info_pop_up(Widget  , char *, XmPushButtonCallbackStruct *),
     quit_pop_up(Widget  , char *, XmPushButtonCallbackStruct *),
     prompt_pop_up(Widget  , char *, XmPushButtonCallbackStruct *);
void prompt_activate(Widget , caddr_t,
                   XmSelectionBoxCallbackStruct *);
void quit_activate(Widget);

Widget top_wid;

main(int argc, char *argv[])

{
    XtAppContext app;
    Widget main_w, menu_bar, info, prompt, quit;
    top_wid = XtVaAppInitialize(&app, "Demos", NULL, 0,
        &argc, argv, NULL, NULL);

    main_w = XtVaCreateManagedWidget("main_window",
        xmMainWindowWidgetClass,   top_wid,
        XmNheight, 300,
        XmNwidth,300,
        NULL);
    menu_bar = XmCreateMenuBar(main_w, "main_list",
        NULL, 0);
    XtManageChild(menu_bar);

    /* create prompt widget + callback */
    prompt = XtVaCreateManagedWidget( "Prompt",
        xmCascadeButtonWidgetClass, menu_bar,
        XmNmnemonic, 'P',
        NULL);

    /* Callback has data passed to */
    XtAddCallback(prompt, XmNactivateCallback,
                  prompt_pop_up, NULL);
    /* create quit widget + callback */

    quit = XtVaCreateManagedWidget( "Quit",
        xmCascadeButtonWidgetClass, menu_bar,
        XmNmnemonic, 'Q',
        NULL);


    /* Callback has data passed to */

    XtAddCallback(quit, XmNactivateCallback, quit_pop_up,
                  "Are you sure you want to quit?");
    /* create help widget + callback */

    info = XtVaCreateManagedWidget( "Info",
        xmCascadeButtonWidgetClass, menu_bar,
        XmNmnemonic, 'I',
        NULL);

    XtAddCallback(info, XmNactivateCallback, info_pop_up,
            "Select Prompt Option To Get Program Going.");

    XtRealizeWidget(top_wid);
    XtAppMainLoop(app); }
 void prompt_pop_up(Widget cascade_button, char *text,
XmPushButtonCallbackStruct *cbs)

{   Widget dialog, remove;
    XmString xm_string1, xm_string2;
    Arg args[3];

    /* label the dialog */
    xm_string1 = XmStringCreateLocalized("Enter Text Here:");
    XtSetArg(args[0], XmNselectionLabelString, xm_string1);
    /* default text string  */
    xm_string2 = XmStringCreateLocalized("Default String");
    XtSetArg(args[1], XmNtextString, xm_string2);
   /* set up default button for cancel callback */
    XtSetArg(args[2], XmNdefaultButtonType,
                    XmDIALOG_CANCEL_BUTTON);

    /* Create the WarningDialog */
    dialog = XmCreatePromptDialog(cascade_button, "prompt",
                                  args, 3);

    XmStringFree(xm_string1);
    XmStringFree(xm_string2);
    XtAddCallback(dialog, XmNokCallback, prompt_activate,
                  NULL);
   /* Scrub Prompt Help Button */
    remove = XmSelectionBoxGetChild(dialog,
                      XmDIALOG_HELP_BUTTON);

    XtUnmanageChild(remove);  /* scrub HELP button */

    XtManageChild(dialog);
    XtPopup(XtParent(dialog), XtGrabNone); }
 void info_pop_up(Widget cascade_button, char *text,
XmPushButtonCallbackStruct *cbs)

{   Widget dialog;
    XmString xm_string;
    extern void info_activate();
    Arg args[2];

    /* label the dialog */
    xm_string = XmStringCreateLocalized(text);
    XtSetArg(args[0], XmNmessageString, xm_string);
    /* set up default button for OK callback */
    XtSetArg(args[1], XmNdefaultButtonType,
             XmDIALOG_OK_BUTTON);
    /* Create the InformationDialog as child of
       cascade_button passed in */
    dialog = XmCreateInformationDialog(cascade_button,
                                       "info", args, 2);

    ScrubDial(dialog, XmDIALOG_CANCEL_BUTTON);
    ScrubDial(dialog, XmDIALOG_HELP_BUTTON);

    XmStringFree(xm_string);

    XtManageChild(dialog);
    XtPopup(XtParent(dialog), XtGrabNone);
}
 void quit_pop_up(Widget cascade_button, char *text,
XmPushButtonCallbackStruct *cbs)

{   Widget dialog;
    XmString xm_string;
    Arg args[1];

    /* label the dialog */
    xm_string = XmStringCreateLocalized(text);
    XtSetArg(args[0], XmNmessageString, xm_string);
    /* set up default button for cancel callback */
    XtSetArg(args[1], XmNdefaultButtonType,
                   XmDIALOG_CANCEL_BUTTON);
    /* Create the WarningDialog */
    dialog = XmCreateWarningDialog(cascade_button, "quit",
                                   args, 1);

    ScrubDial(dialog, XmDIALOG_HELP_BUTTON);

    XmStringFree(xm_string);

    XtAddCallback(dialog, XmNokCallback, quit_activate,
                  NULL);

    XtManageChild(dialog);
    XtPopup(XtParent(dialog), XtGrabNone);
}
 /* routine to remove a DialButton from a Dialog */

void ScrubDial(Widget wid, int dial)

{  Widget remove;

   remove = XmMessageBoxGetChild(wid, dial);

   XtUnmanageChild(remove);
}
 /* callback function for Prompt activate */

void prompt_activate(Widget widget, XtPointer client_data,
XmSelectionBoxCallbackStruct *selection)

{   Widget dialog;
    Arg args[2];
    XmString xm_string;

    /* compose InformationDialog output string */
    /* selection->value holds XmString entered to prompt */

    xm_string = XmStringCreateLocalized("You typed: ");
    xm_string = XmStringConcat(xm_string,selection->value);
    XtSetArg(args[0], XmNmessageString, xm_string);
    /* set up default button for OK callback */
    XtSetArg(args[1], XmNdefaultButtonType,
             XmDIALOG_OK_BUTTON);

    /* Create the InformationDialog to echo
       string grabbed from prompt */
    dialog = XmCreateInformationDialog(top_wid,
           "prompt_message", args, 2);

    ScrubDial(dialog, XmDIALOG_CANCEL_BUTTON);
    ScrubDial(dialog, XmDIALOG_HELP_BUTTON);

    XtManageChild(dialog);
    XtPopup(XtParent(dialog), XtGrabNone);
}
/* callback routines for quit ok dialog */


void quit_activate(Widget dialog) {
    printf("Quit Ok was pressed.\n");
    exit(0);
}
The purpose of both these widgets is to allow the user to select from a list (or in set of lists) displayed within the Dialog. The creation and use of Selection and FileSelection Dialogs is similar. The FileSelectionDialog (Fig. 10.7) allows the selection of files from a directory which has use in many applications (text editors, graphics programs etc.) The FileSelection Dialog provides a means for merely browsing directories and selecting file names. It is up to the application to read/write the file, or to use the file name appropriately. The SelectionDialog allows for more general selection. We will study the FileSelectionDialog as it is more complex and it is also more commonly used.
Fig. 10.7 The FileSelectionDialog Widget
To create a FileSelectionDialog , the
XmCreateFileSelectionDialog() function is
commonly used. You must include the <Xm/FileSB.h> header file.
A FileSelectionDialog has many resources you can set to control the search of files: (All resources are XmString data types except where indicated.)
*.c so as only to list C source files in the dialog.
<Xm/FileSB.h>.
The search directory, directory mask and others can be altered from within the Dialog window.
The FileSelectionDialog has many child widgets under its control. It is sometimes useful to take control of these child widget in order to have greater control of their resources or callback or even to remove (XtUnmanageChild()) one. The function XmFileSelectionBoxGetChild() is used to return the ID of a specified child widget. The function takes two arguments:
<Xm/FileSB.h> and include:
XmDIALOG_APPLY_BUTTON, 		 XmDIALOG_LIST,
XmDIALOG_CANCEL_BUTTON, 		 XmDIALOG_LIST_LABEL,
XmDIALOG_DEFAULT_BUTTON, TXmDIALOG_OK_BUTTON,
XmDIALOG_DIR_LIST, 		 XmDIALOG_SELECTION_LABEL,
XmDIALOG_DIR_LIST_LABEL, 		 XmDIALOG_SEPARATOR,
XmDIALOG_FILTER_LABEL, 		 XmDIALOG_TEXT,
XmDIALOG_FILTER_TEXT, 		 XmDIALOG_WORK_AREA,
XmDIALOG_HELP_BUTTON.
The program file_select.c simply looks for C source
files in a directory -- the XmNdirMask resource is set to filter out only
*.c files. If a file is selected it's listing is printed to standard
output.
#include <stdio.h>

#include <Xm/Xm.h>
#include <Xm/MainW.h>
#include <Xm/CascadeB.h>
#include <Xm/MessageB.h>
#include <Xm/PushB.h>
#include <Xm/FileSB.h>


/* prototype callbacks and other functions */
void  quit_pop_up(Widget , char *,
                  XmPushButtonCallbackStruct *),
void  select_pop_up(Widget , char *,
                   XmPushButtonCallbackStruct *);
void ScrubDial(Widget, int);
void select_activate(Widget , XtPointer ,
                     XmFileSelectionBoxCallbackStruct *)
void quit_activate(Widget)
void cancel(Widget , XtPointer ,
            XmFileSelectionBoxCallbackStruct *);
void error(char *, char *);

File *fopen();

Widget top_wid;


main(int argc, char *argv[])

{
    XtAppContext app;
    Widget main_w, menu_bar, file_select, quit;


    top_wid = XtVaAppInitialize(&app, "Demos", NULL, 0,
        &argc, argv, NULL, NULL);

    main_w = XtVaCreateManagedWidget("main_window",
        xmMainWindowWidgetClass,   top_wid,
        XmNheight, 300,
        XmNwidth,300,
        NULL);
    menu_bar = XmCreateMenuBar(main_w, "main_list",
        NULL, 0);
    XtManageChild(menu_bar);


    /* create prompt widget + callback */

    file_select = XtVaCreateManagedWidget( "Select",
        xmCascadeButtonWidgetClass, menu_bar,
        XmNmnemonic, 'S',
        NULL);
    /* Callback has data passed to */
    XtAddCallback(file_select, XmNactivateCallback,
                  select_pop_up, NULL);

    /* create quit widget + callback */
    quit = XtVaCreateManagedWidget( "Quit",
        xmCascadeButtonWidgetClass, menu_bar,
        XmNmnemonic, 'Q',
        NULL);
    /* Callback has data passed to */
    XtAddCallback(quit, XmNactivateCallback, quit_pop_up,
                  "Are you sure you want to quit?");

    XtRealizeWidget(top_wid);
    XtAppMainLoop(app);
}
void select_pop_up(Widget cascade_button, char *text,
                   XmPushButtonCallbackStruct *cbs)

{   Widget dialog, remove;
    XmString mask;
    Arg args[1];

    /* Create the FileSelectionDialog */
    mask  = XmStringCreateLocalized("*.c");
    XtSetArg(args[0], XmNdirMask, mask);
    dialog = XmCreateFileSelectionDialog(cascade_button,
           "select", args, 1);
    XtAddCallback(dialog, XmNokCallback, select_activate,
                  NULL);
    XtAddCallback(dialog, XmNcancelCallback, cancel, NULL);

    remove = XmSelectionBoxGetChild(dialog,
           XmDIALOG_HELP_BUTTON);

    XtUnmanageChild(remove); /* delete HELP BUTTON */


    XtManageChild(dialog);
    XtPopup(XtParent(dialog), XtGrabNone);
}
void quit_pop_up(Widget cascade_button, char *text,
                 XmPushButtonCallbackStruct *cbs)

{   Widget dialog;
    XmString xm_string;
    Arg args[2];

    /* label the dialog */
    xm_string = XmStringCreateLocalized(text);
    XtSetArg(args[0], XmNmessageString, xm_string);
    /* set up default button for cancel callback */
    XtSetArg(args[1], XmNdefaultButtonType,
             XmDIALOG_CANCEL_BUTTON);
    /* Create the WarningDialog */
    dialog = XmCreateWarningDialog(cascade_button, "quit",
           args, 2);

    ScrubDial(dialog, XmDIALOG_HELP_BUTTON);

    XmStringFree(xm_string);

    XtAddCallback(dialog, XmNokCallback, quit_activate,
                  NULL);

    XtManageChild(dialog);
    XtPopup(XtParent(dialog), XtGrabNone);
}
 /* routine to remove a DialButton from a Dialog */

void ScrubDial(Widget wid, int dial)

{  Widget remove;

   remove = XmMessageBoxGetChild(wid, dial);
   XtUnmanageChild(remove);
}
/* callback function for Prompt activate */

void select_activate(Widget widget, XtPointer client_data,
                     XmFileSelectionBoxCallbackStruct *selection)

{   /* function opens file (text) and prints to stdout */

    FILE *fp;
    char *filename, line[200];


    XmStringGetLtoR(selection->value,
 XmSTRING_DEFAULT_CHARSET, &filename);
    if ( (fp = fopen(filename,"r")) == NULL)
      error("CANNOT OPEN FILE", filename);
  else
    {  while ( !feof(fp) )
          { fgets(line,200,fp);
            printf("%s\n",line);
          }
       fclose(fp);
    }
}
void cancel(Widget widget, XtPointer client_data,
            XmFileSelectionBoxCallbackStruct *selection)

{ XtUnmanageChild(widget);  /* undisplay widget */
}

void error(char *s1, char *s2)

{  /* prints error to stdout */


   printf("%s: %s\n", s1, s2);
   exit(-1);

}
 /* callback routines for quit ok dialog */


void quit_activate(Widget dialog)

{
    printf("Quit Ok was pressed.\n");
    exit(0);

}
Motif allows the programmer to create new customised Dialogs. BulletinBoardDialogs and FormDialogs let you place widgets within them in a similar fashion to their corresponding BulletinBoard and Form widgets. We will, therefore, not deal with these further in this text.
NEED SOME ON ERROR, WORKING, Question, PROMPT AND OTHER
Exercise 8579
Rewrite the error() function of the file_select.c program so that errors trapped by this program are displayed in an ErrorDialog widget and not simply printed to standard output.
Text editing is a key task in many applications. For example, Single-line editors are a convenient and flexible means of string data entry for many applications. Indeed, the FileSelectionDialog widget (Chapter 10) and other composite widgets have a single text widget as constituent components. More complete multi-line text entry may also be required for many applications.
Motif, conveniently provides a fully functional text widget. This saves the application programmer a lot of work, since tasks such as cut and paste editing, text search and insertion are provided within the widget class.
Note: Coupled with other advanced facilities such as FileSelection widgets etc., we could easily assemble our own fully working text editor application program from component widget classes and little other code.
Motif 1.2 provides two classes of text widgets:
Both the above widgets use the (standard C) String data type as the base structure for all text operations. This is different from most other Motif widgets. Motif 2.0 provides an additional text widget, CSText , which is basically similar to the Text widget except that the XmString data type is used in text processing.
We will study the Text widget in detail in this Chapter. The TextField is, essentially, a simpler version of this and will therefore only be addressed when appropriate. In fact, we can actually make the Text widget a single line type by setting the resource XmNeditMode to XmSINGLE_LINE_EDIT .
There are a variety of ways to create a Text widget:
<Xm/Text.h> header file for all Text widget
applications. There are corresponding <Xm/TextF.h>
and <Xm/CSText.h> header files for the TextField amd CSText widgets
respectively.
There are various resources that can be usefully set for a Text widget:
The Text widget is a dynamic structure and text may be inserted into the widget at any time. There are many text editing and insertion functions that will be introduced shortly. The simplest operation is actually setting the text that will be used by the Text widget.
The function XmTextSetString() puts a specified ordinary (C type) string into a specified widget. It has two arguments:
Fig. 11.1 ScrolledText Widget
#include <Xm/Xm.h>
#include <Xm/Text.h>
#include <Xm/MainW.h>
#include <Xm/CascadeB.h>

#include <stdio.h>
#include <sys/stat.h>
#include <sys/types.h>


/* Prototype Callback and other functions */

void  quit_call(),
      help_call(),
      read_file(Widget);
main(int argc, char *argv[])

{   Widget        top_wid, main_w, menu_bar,
                  menu, quit, help, text_wid;
    XtAppContext  app;
    Arg           args[4];

    /* initialize */
    top_wid = XtVaAppInitialize(&app, "Text",
        NULL, 0, &argc, argv, NULL, NULL);
        main_w = XtVaCreateManagedWidget("main_w",
        xmMainWindowWidgetClass, top_wid,
        /* XmNscrollingPolicy,   XmVARIABLE, */
        NULL);

    menu_bar = XmCreateMenuBar(main_w, "main_list",
        NULL, 0);
    XtManageChild(menu_bar);

     /* create quit widget + callback */

    quit = XtVaCreateManagedWidget( "Quit",
        xmCascadeButtonWidgetClass, menu_bar,
        XmNmnemonic, 'Q',
        NULL);
    XtAddCallback(quit, XmNactivateCallback,
        quit_call, NULL);

    /* Create ScrolledText -- this is work area for the
       MainWindow */

    XtSetArg(args[0], XmNrows,      30);
    XtSetArg(args[1], XmNcolumns,   80);
    XtSetArg(args[2], XmNeditable,  False);
    XtSetArg(args[3], XmNeditMode,  XmMULTI_LINE_EDIT);
    text_wid = XmCreateScrolledText(main_w, "text_wid",
                                    args, 4);
    XtManageChild(text_wid);
    /*  read file and put data in text widget */
    read_file(text_wid);

    XtRealizeWidget(top_wid);
    XtAppMainLoop(app);
}

void read_file(Widget  text_wid)

{
    static char *filename = "text.c";
    char  *text;
    struct stat statb;
    FILE *fp;

   /* check file is a regular text file and open it */
    if ( (stat(filename, &statb) == -1)
         || !(fp = fopen(filename, "r")))
    {   fprintf(stderr, "Cannot open file: %s\n", filename);
        XtFree(filename);
        return;
    }

    /* Map file text in the TextWidget */

    if (!(text = XtMalloc((unsigned)(statb.st_size+1))))
    {   fprintf(stderr, "Can't alloc enough space for %s",
                filename);
        XtFree(filename);
        fclose(fp);
        return;
    }
    if (!fread(text, sizeof(char), statb.st_size+1, fp))
        fprintf(stderr, "File read error\n");

    text[statb.st_size] = 0; /* be sure to NULL-terminate */

    /* insert file contents in TextWidget */

    XmTextSetString(text_wid, text);

    /* free memory
    */
    XtFree(text);
    XtFree(filename);
    fclose(fp);
}
void quit_call()

{   printf("Quitting program\n");
    exit(0);
}
Motif provides many functions that allow the editing of the text (String) stored in the widget. Text can be searched, inserted and replaced.
To replace all or parts of the text in a Text widget use the XmTextReplace() function. It has four arguments:
No matter how long the specified replacement text string is, text is only replaced (character-by-character) between the 2 positions. However, if the start and end positions are equal then text is inserted after the given position.
An alternative method to insert text , is to use the XmTextInsert() function. This takes 3 arguments:
To Search for a string in the Text widget , use the XmTextFindString() function with the following arguments:
XmTextFindString() returns a Boolean value which is False if no string was found.
To obtain text (in full) from a Text widget use the XmTextGetString() function to return a String for a specified widget. An example use of this function is to save text stored in the Text widget to a file. This can be simply achieved by:
The function XmTextGetSubstring() can be used to get a portion of text from a widget. It takes 5 arguments:
Similar functions exist for both the TextField and the CSText widgets. An example of these functions in use with the TextField widget is given is Section 11.7.
Similar functions exist for both the TextField and the CSText widgets. An example of these functions in use with the TextField widget is given is Section 11.7.
Behind almost all of the Text widget functions, described above, lie default callback resources. These control the basic text editing facilities: cut and paste, searching etc. However, there may be occasions when the application may need greater control over things. Several callback resources are provided for this purpose. Briefly theses are:
We can use verifyCallbacks for checking user inputs -- for example for password verification.
The test_for_echo.c program (Section 9.3) illustrates the use of some of the editing and scrolling functions described. The program basically operates as follows:
Exercise 8623
Modify the text.c (Section 11.3) so that it employs a FileSelection widget to allow the user to select a file, which it then reads and displays in a ScrolledText Widget .
MORE EXERCISES
The List widget allows selection from a variety of specified items. The List widget is actually one of the component widgets in the FileSelectionBox widget(Chapter 10).
The use of a List is similar to that of a Menu, but is a little more flexible:
An example of a List Widget is shown in Fig. 12.1.
Fig. 12.1 Output of list.c
To create a simple list use: XtVaCreateManagedWidget(), and specify
xmListWidgetClass as the widget type (or use
XmCreateList(). The header file <Xm/List.h> must be included. We will
usually want to create a ScrolledList. To do this use:
XmCreateScrolledList().
There are a number of useful resources:
<Xm/List.h>). Only one item may be selected.
As the name of this widget implies, the List is a dynamic structure that can grow or shrink as items are added or deleted.
To add an item to a list, use the function XmListAddItem() , which takes 3 arguments:
Another function XmListAddItemUnselected() has exactly the same syntax as XmListAddItem(), above. This function will guarantee that an item is not selected when it is added. This is not always the case with the XmListAddItem(), since selection will be dependent on the currently selected list index.
To remove a single named (XmString) item, str, from a
List widget, use the
XmListDeleteItem(Widget List, XmString
str) function.
To remove a number of named (XmString) items, use the
XmListDeleteItems(Widget List, XmString *del_items)
function where the second argument, del_items, is an array of
XmStrings that contain the names of items being deleted.
If you know the position of item(s) in a List, as opposed to their names, you can use the following functions:
To delete all items form a list, use XmListDeleteAllItems(Widget wid).
Two functions XmListSelectItem(Widget, XmString, Boolean) and
XmListSelectPos(Widget, int, Boolean) may be used to select an
item from within a program.
The Boolean value, if set to True, will call the callback function associated with the particular List.
To deselect items use XmListDeselectItem(Widget, XmString),
XmListDeselectPos(Widget, int) or XmListDeselectAllItems(Widget).
The operation of which is similar to corresponding delete functions.
Since the List is dynamic we may need to know how long the list is, and which items are currently selected etc.. Some of these values can be obtained from the callback structure of a list (see Section12.3 below). However, if no callback has been invoked the programmer may sometimes still need to access this information.
The List resources are updated automatically (by default callback resources) so all we need to do is to XtGetValues() (or something similar) for the resource we want. For example:
Obtain the value of the resource XmNitemCount.
   Arg args[1]; /* Arg array */
   int n = 1; /* number arguments */
   int list_size; /* value to store XtGetValue() request */

   ......

   XtSetArg(args[0], XmNitemCount, &list_size);
   XtGetValues(list_wid, args, n);

			printf("The Size of the list = %d\n", list_size);
where list_wid is the List widget we request this information from.
Note: We pass the address of list_size to XtSetArg() since we need to specify a pointer to physical (program) memory in which to store the result. The value of list_size is available after the XtGetValues() call and is only accurate until the next user (or application) list addition/subtractions.
Obtain the value of the resource XmNselectedItemCount:
   Arg args[1]; /* Arg array */
   int n = 1; /* number arguments */
   int select_count; /* value to store
                        XtGetValue() request */

   ......

   XtSetArg(args[0], XmNselectedItemCount, &select_count);
   XtGetValues(list_wid, args, n);

			printf("The Numver of selected list items = %d\n",
          select_count);
Recall that the use of XtGetValue() is similar to that of
XtSetValue() (Chapter![]() ).
).
Default List callback functions facilitate common interaction with a List such as selection of an item (or multiple items) and addition or deletion of items. More importantly, related resource information is automatically updated ( e.g. the current List size, XmNitemCount). There is a List callback resource for each of the selection types (e.g. XmNsingleSelectionCallback ) and also a XmNdefaultActionCallback . The application programmer is free to add his own callback functions in the usual manner. In this case, the selection policy callback will be called first and then the default.
The Callback function has the usual form:
list_cbk(Widget w, XtPointer data, XmListCallbackStruct *cbk)
Elements of the XmListCallbackStruct include:
An example of the use of a List callback is given in the following list.c example program.
We create a simple list that shows a selection of colours. Selection of these
colours changes the background colour![]() of the List widget.
of the List widget.
#include <Xm/Xm.h>
#include <Xm/List.h>


/* Prototype Callback */

void list_cbk(Widget , XtPointer ,
              XmListCallbackStruct *);

String colours[] = { "Black",  "Red", "Green",
                     "Blue", "Grey"};

Display *display; /* xlib id of display */
Colormap cmap;

main(int argc, char *argv[])

{
    Widget           top_wid, list;
    XtAppContext     app;
    int              i, n = XtNumber(colours);
    XColor           back, fore, spare;
    XmStringTable    str_list;
    Arg              args[4];


    top_wid = XtVaAppInitialize(&app, "List_top", NULL, 0,
        &argc, argv, NULL, NULL);

    str_list =
      (XmStringTable) XtMalloc(n * sizeof (XmString *));

    for (i = 0; i < n; i++)
        str_list[i] = XmStringCreateSimple(colours[i]);

    list = XtVaCreateManagedWidget("List",
        xmListWidgetClass,     top_wid,
        XmNvisibleItemCount,   n,
        XmNitemCount,          n,
        XmNitems,              str_list,
        XmNwidth,               300,
        XmNheight,              300,
        NULL);

    for (i = 0; i < n; i++)
        XmStringFree(str_list[i]);
    XtFree(str_list);

    /* background pixel to black foreground to white */

    cmap = DefaultColormapOfScreen(XtScreen(list));
    display = XtDisplay(list);

    XAllocNamedColor(display, cmap, colours[0], &back,
                     &spare);
    XAllocNamedColor(display, cmap, "white", &fore, &spare);

    n = 0;
    XtSetArg(args[n],XmNbackground, back.pixel);
    ++n;
    XtSetArg(args[n],XmNforeground, fore.pixel);
    ++n;
    XtSetValues(list, args, n);

    XtAddCallback(list, XmNdefaultActionCallback, list_cbk,
                  NULL);

    XtRealizeWidget(top_wid);
    XtAppMainLoop(app);
}

/* called from any of the "Colour" list items.
   Change the color of the list widget.
   Note: we have to use dynamic setting with XtSetValues()..
 */
void list_cbk(Widget w, XtPointer data,
         XmListCallbackStruct *list_cbs)

{   int n =0;
    Arg args[1];
    String selection;
    XColor xcolour, spare; /* xlib color struct */

    /* list->cbs holds XmString of selected list item */
    /* map this to "ordinary" string */

    XmStringGetLtoR(list_cbs->item, XmSTRING_DEFAULT_CHARSET,
                    &selection);

    if (XAllocNamedColor(display, cmap, selection,
                         &xcolour, &spare) == 0)
       return;

    XtSetArg(args[n],XmNbackground, xcolour.pixel);
    ++n;
    /* w id of list widget passed in */
    XtSetValues(w, args, n);

}
Needs SOME
The Scale widget allows the user to input numeric values into a program. An example of the Scale widget is shown in Fig. 13.1.
Fig. 13.1 Output of scale.c
To create a Scale Widget use
XtVaCreateManagedWidget() , with a
xmScaleWidgetClass class pointer or
use XmCreateScale() . Once again a header file,
<Xm/Scale.h>, needs to be included in all programs using Scale widgets.
The following Scale Widget Resources are typically used:
The application programmer must take care of the input value to the program. In the above a value will still get returned in the integer range and somewhere in the application there must be a division by 100.
The Scale callback can be called for two types of events:
The Scale callback function is standard:
void scale_cbk(Widget w, XtPointer data,
               XmScaleCallbackStruct *struct)
The structure element value holds the current Scale integer value, and is the only structure element that is really of interest. The scale.c program illustrates this usage.
The program simply brings up a virtual volume Scale (in the context of a virtual amplifier controller). The user changes the value which is caught by a XmNvalueChangedCallback and the current value is interrogated to print a message to standard output.
#include  <Xm/Xm.h>
#include <Xm/Scale.h>

/* Prototype callback  */

void scale_cbk(Widget , int ,
               XmScaleCallbackStruct *);

main(int argc, char **argv)

{   Widget        top_wid, scale;
    XmString	  title;
    XtAppContext  app;


    top_wid = XtVaAppInitialize(&app, "Scale_eg", NULL, 0,
        &argc, argv, NULL, NULL);

    title = XmStringCreateLocalized("Volume");

    scale = XtVaCreateManagedWidget("scale",
        xmScaleWidgetClass, top_wid,
        XmNtitleString,   title,
        XmNorientation,    XmHORIZONTAL,
        XmNmaximum,       11,
        XmNdecimalPoints, 0,
        XmNshowValue,     True,
        XmNwidth,         200,
        XmNheight,        100,
        NULL);

    XtAddCallback(scale,XmNvalueChangedCallback, scale_cbk,
                  NULL);

    XtRealizeWidget(top_wid);
    XtAppMainLoop(app);
}


void scale_cbk(Widget widget, int data,
               XmScaleCallbackStruct *scale_struct)

{    if (scale_struct->value < 4)
       printf("Volume too quiet (%d)\n");
    else if (scale_struct->value < 7)
       printf("Volume Ok (%d)\n");

     else
        if (scale_struct->value < 10)
       printf("Volume too loud (%d)\n");
      else /* Volume == 11 */
       printf("Volume VERY Loud (%d)\n");
}
The Motif Style Guide (Chapter 20) suggests that some sort of markers should be used to gauge distance along a Scale. However, no provision is made for this within the Scale widget class in Motif 1.2. Instead, the programmer must assemble this manually. An assortment of labels and tics can be used to provide some sort of visual ruler (Fig. 13.2).
Fig. 13.2 Better Style Scale Output
The Motif program code that achieves this, by placing vertical
SeparatorGadgets (``![]() '') at equally spaced
intervals, is as follows:
'') at equally spaced
intervals, is as follows:
Widget ...,tics[1];

.......

.......

/* label scale axis */
    for (i=0; i < 11; ++i )
      {  XtSetArg(args[0], XmNseparatorType, XmSINGLE_LINE);
         XtSetArg(args[1], XmNorientation, XmVERTICAL);
         XtSetArg(args[2], XmNwidth, 10);
         XtSetArg(args[3], XmNheight, 5);
         tics[i] = XmCreateSeparatorGadget(scale, "|",
                 args, 4);
      }

    XtManageChildren(tics, 11);

...........
...........
Motif 2.O provides a new convenience function XmScaleSetTicks() to allow for an easier configuration of ticks along the Scale widget. The configuration allows for three different sized ticks to be placed at specified regular intervals along the Scale. Each tick mark is actually a SeparatorGadget oriented perpendicular to the Scale's orientation. The function XmScaleSetTicks() takes seven arguments:
If you specify tick marks for a Scale and then change the Scale's orientation then you must remove all the tick marks and then recreate new ones in the correct orientation. This may be achieved by the following method:
NEEDS SOME
We have already seen scrollbars in action with Text (Chapter 11) and List widgets (Chapter 12). More generally, Motif provides a ScrolledWindow widget that allows scrolling of any widget contained within it. This means that we can place a large view area inside a smaller one and then view portions of the view area.
As we have seen, Motif actually provides convenience functions to produce ready made ScrolledText and ScrolledList widgets. These are, in fact, Text or List widgets contained inside a ScrolledWindow widget.
ScrollBars are the basic components of scrolling. A ScrolledWindow widget may contain either, or both of, horizontal and vertical ScrollBars. Many application will typically use ScrollBars. In the majority of instances, ScrollBar widgets will be created automatically by higher level widgets (e.g. ScrolledWindow, ScrolledText or ScrolledList). Occasionally, greater control over the default settings of the ScrollBar will be required. Sometimes, these resources can be set as resources of the higher level widget, other times the resources will need to be set explicitly. In this chapter, we will highlight important ScrollBar resources and illustrate how they can be set in both of the above scenarios.
ScrolledWindow widgets can be created manually with XtVaCreateManagedWidget() , with the xmScrolledWindowWidgetClass pointer or with XmCreateScrolledWindow() function.
Associated definitions for this widget class etc. are included in the
<Xm/ScrolledW.h> header file.
Useful resources include:
You may have to create ScrollBars yourself, especially if the scrolling policy is defined as XmAPPLICATION_DEFINED. Alternatively, you may get the ID of a ScrollBar from a ScrolledWindow (e.g. XmNhorizontal resource).
To create a ScrollBar, use
XtVaCreateManagedWidget() with
xmScrollBarWidgetClass or use
XmCreateScrollBar() .
To obtain a horizontal ScrollBar ID from a ScrolledWindow:
   Arg args[1]; /* Arg array */
   int n = 1; /* number arguments */
   Widget scrollwin,scrollbar;


   scrollwin = XmCreateScrolledWindow(.....)
   ......

   XtSetArg(args[0], XmNhorizontal, &scrollbar);
   XtGetValues(scrollwin, args, n);
Typical ScrollBar resources include:
The Callback resources for a ScrollBar are:
NEEDS SOME????????
A Toggle Widget basically provides a simple switch type of selection. The Toggle is either a square or circle shape indicator which if pressed can be turned on and if pressed again turned off. Text and pictorial items (pixmaps) can be used to label a Toggle .
Several Toggle widgets can be grouped together to allow greater control of selection. Motif provides two methods of grouping Toggles together.
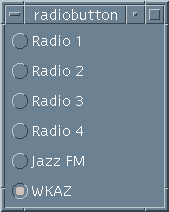
Fig. 15.1 A RadioBox set of Toggle Widgets
Fig. 15.2 A CheckBox set of Toggle Widgets
To create a single Toggle use
XtVaCreateManagedWidget() with a
xmToggleButtonWidgetClass
pointer or use XmCreateToggleButton() .
The header file <Xm/ToggleB.h> holds definitions etc for this
widget.
Several Toggle Resources are relevant to the programmer:
The Pixmap is a standard X data type. You can use XmGetPixmap() to load in a Pixmap from a file. (See Chapter 16 on Graphics and Xlib for further details.)
Toggle Callbacks have the usual callback function format and are prototyped by:
void toggle_cbk(Widget, XtPointer,
                XmToggleCallbackStruct *).
Toggle Callbacks are activated upon an XmNvalueChangedCallback. The XmToggleCallbackStruct has a boolean element set that is True if the Toggle is on. The toggle.c (Section 15.3 below) illustrates the use of Toggle callbacks.
#include <Xm/Xm.h>
#include <Xm/ToggleB.h>
#include <Xm/RowColumn.h>

/* Prototype callback */
void toggle1_cbk(Widget , XtPointer ,
XmToggleButtonCallbackStruct *),
void toggle2_cbk(Widget , XtPointer ,
XmToggleButtonCallbackStruct *);

main(int argc, char **argv)

{
    Widget toplevel, rowcol, toggle1, toggle2;
    XtAppContext app;


    toplevel = XtVaAppInitialize(&app, "Toggle", NULL, 0,
        &argc, argv, NULL, NULL);

    rowcol = XtVaCreateWidget("rowcol",
        xmRowColumnWidgetClass, toplevel,
        XmNwidth, 300,
        XmNheight, 200,
        NULL);

    toggle1 = XtVaCreateManagedWidget("Dolby ON/OFF",
        xmToggleButtonWidgetClass, rowcol, NULL);

    XtAddCallback(toggle1, XmNvalueChangedCallback,
                  toggle1_cbk, NULL);

    toggle2 = XtVaCreateManagedWidget("Dolby B/C",
            xmToggleButtonWidgetClass, rowcol, NULL);

    XtAddCallback(toggle2, XmNvalueChangedCallback,
                  toggle2_cbk, NULL);
    XtManageChild(rowcol);
    XtRealizeWidget(toplevel);
    XtAppMainLoop(app);
}

void toggle1_cbk(Widget widget, XtPointer client_data,
XmToggleButtonCallbackStruct *state)

{  printf("%s: %s\n", XtName(widget),
            state->set? "on" : "off");
}


void
toggle2_cbk(Widget widget, XtPointer client_data,
XmToggleButtonCallbackStruct *state)

{ printf("%s: %s\n", XtName(widget), state->set ? "B" : "C");
}
You can, if you wish, group RadioBoxes or CheckBox Toggles in RowColumn, or Forms yourself (as has been done in the above toggle.c program).
However, Motif provides a few convenience functions, XmCreateSimpleRadioBox() and XmCreateSimpleCheckBox() are common examples.
Basically, these are RowColumn Widgets with Toggle children created automatically. Appropriate resources can be set, e.g. XmNindicatorType or XmNradioBehaviour (in this enhanced RowColumn Widget) .
NEED SOME
This Chapter will deal specifically with the introduction of Xlib - the low level X library. Recall that Xlib provides the means of communication between the application and the X system. The Xlib library of (C) subroutines is large and of a comparable size to Motif. Many of Xlib's routines deal with the creation, maintenance and interaction between windows and applications. Xlib does not have any concept of widgets and thus does not provide provide any (high level) means of interaction. In general, writing complete application solely in Xlib is not a good idea. Motif provides many useful, complete GUI building blocks that should always be used if available. For example, do you really want to write a complete text editing library in Xlib, when Motif provides one for free?
If you use Motif then there should never be any need to resort to
Xlib for window creation![]() . Motif is far more powerful and
flexible. Consequently, in this and forthcoming Chapters, we will only deal with
issues that affect the interfacing of Xlib with Motif and the Xt toolkit.
. Motif is far more powerful and
flexible. Consequently, in this and forthcoming Chapters, we will only deal with
issues that affect the interfacing of Xlib with Motif and the Xt toolkit.
However, for certain tasks we will have to resort to Xlib. The sort of tasks that we will be concerned with in this text are:
Xlib deals with much lower level objects than widgets. When you write or draw in Xlib reference, may be made to the following:
If we are programming in Xlib alone, we would have to create windows and open displays ourselves (see [Mar96]) for details). However, if we are using a higher level toolkit such a Motif and require to call on Xlib routines then we need to obtain the above information from an appropriate widget in order pass on appropriate parameter values in the Xlib function calls.
Functions are available to obtain this information readily from a Widget. For example XtDisplay(), XtWindow(), XtScreen() etc. can be used to obtain the ID of a given Xlib Display, Window, or Screen structure respectively from a given widget. Default Values of these structures are also typically used. Functions DefaultDepthofScreen(), RootWindowofScreen() are examples.
Sometimes, in a Motif program, you may have to create an Xlib structure from scratch. The GC is the most frequently created structure that concerns us. The Function XCreateGC() creates a new GC data structure.
We will look at the mechanics of assembling Xlib graphics within a Motif program when we study DrawingAreas in Chapter 17. For the remainder of this Chapter we will continue to introduce basic Xlib concepts. In the coming Sections, reference is made to programs that are described in Chapter 17.
As mentioned in the previous Section, the GC is responsible for setting the properties of lines and basic (2D) shapes. GCs are therefore used with every Xlib drawing function. The draw.c (Section 17.3.1) program illustrates the setting of a variety of GC elements.
To create a GC use the (Xlib) function XCreateGC() . It has 4 parameters:
The XGCValues structure contains elements like foreground, background, line_width, line_style, etc. that we can set for obvious results. The mask has predefined values such as GCForeground, GCBackground, and GCLineStyle.
In draw.c we create a GC structure, gc, and set the foreground.
Xlib provides two macros BlackPixel() and WhitePixel() which will find the default black and white pixel values for a given Display and Screen if the default colourmaps are installed. Note that the reference to BlackPixel() and WhitePixel() can be a little confusing since the pixel colours returned may not necessarily be Black or White. BlackPixel() actually refers to the foreground colour and WhitePixel() refers to the background colour.
Therefore, to create a GC that only sets foreground colour to the default for a given display and screen:
 gcv.foreground = BlackPixel(display, screen);
 gc = XCreateGC(display, screen, GCForeground, &gcv);
where gcv is a XCGValues structure and gc a GC structure and GCForeground sets the mask to only allow alteration of the foreground.
To set both background and foreground:
 gcv.foreground = BlackPixel(display, screen);
 gcv.background = WhitePixel(display, screen);
 gc = XCreateGC(display, screen,
                GCForeground | GCBackground, &gcv);
where we use the | (OR) in the mask parameter that allows
both the values to be set in the XGCValues structure.
An alternative way to change GC elements is to use Xlib convenience functions to set appropriate GC values. Example functions include :
XSetForeground(), XSetBackground(), XSetLineAttributes() .
These set GC values for a given display and gc, for example:
XSetBackground(display, gc, WhitePixel(display, screen));
Further examples of their use are shown in the draw.c program (Section 17.3.1).
The simplest function is XDrawPoint(Display *d, Drawable dr, GC gc, int x, int y) which draws a point at position (x, y) to a given Drawable on a Display. This effectively colours a single pixel on the Display.
The function XDrawPoints(Display *d, Drawable dr, GC gc, XPoint *pts, int n, int mode) is similar except that an n element array of XPoints is drawn. The mode may be defined as being either CoordModeOrigin or CoordModePrevious. The former mode draws all points relative to the origin whilst the latter mode draws relative to the last point.
Other Xlib common drawing functions include:
This function behaves much like XDrawLines().
The shape parameter is either Complex, Nonconvex or Convex and controls how the server may configure the shading operation.
The x, y, width and height define a bounding box for the arc. The arc is drawn(Fig. 16.1) from the centre of the box. The angle1 and angle2 define the start and end points of the arc. The angles specify 1/64th degree steps measured anticlockwise. The angle1 is relative to the 3 o'clock position and angle2 is relative to angle1.
Fig. ![]() arc.c display
arc.c display
Thus to draw a whole circle set the width and height equal to the diameter of the circle and angle1 = 0, angle2 = 360*64 = 23040.
If a window has been obscured then we will have to redraw the window when it gets re-exposed. This is the responsibility of the application and not the X window manager or system. In order to redraw a window we may have to go through all the drawing function calls that have previously been used to render our window's display. However, re-rendering a display in this manner will be cumbersome and may involve some complicated storage methods -- there maybe be many drawing functions involved and the order in which items are drawn may also be important
Fortunately, X provides a mechanism that overcomes these (and other less serious) problems. The use of Xlib Pixmaps is the best approach.
A Pixmap is an off-screen Drawable area.
We can draw to a Pixmap in the same way as we can draw to a Window. We use the standard Xlib graphics drawing functions (Section 16.3) but instead of specifying a Window ID as the Drawable we provide a Pixmap ID. Note, however, that no immediate visual display effect will occur when drawing to a Pixmap. In order to see any effect we must copy the Pixmap to a Window.
The program draw_input2.c (Section 17.3.3) draws to pixmaps instead of to the window.
To create a Pixmap the XCreatePixmap() function should be used. This function takes 5 arguments and returns a Pixmap structure:
When you have finished using a Pixmap it is a good idea to free the memory in which it has been stored by calling:
XFreePixmap(Display*, Pixmap) .
If you want to clear a Pixmap (not done automatically) use XFillRectangle() to draw a background coloured rectangle that is the dimension of the whole Pixmap or use XClearArea(), XClearWindow() or similar functions.
To copy a Pixmap onto another Pixmap or a Window use:
 XCopyArea(Display *display, Drawable source,
      Drawable destination, GC gc,
      int src_x, src_y,
      int width, int height,
      int dest_x, int dest_y);
where (src_x, src_y) specify the coordinates in the source pixmap where copy starts, width and height specify the dimensions of the copied area and (dest_x, dest_y) are the start coordinates in the destination where pixels are placed.
Fonts are necessary in Motif as all XmString are drawn to the screen using fonts residing in the X system. A font is a complete set of characters (upper-case and lower-case letters, punctuation marks and numerals) of one size and one typeface. In order for a Motif program to gain access to different typefaces, fonts must be loaded onto the X server. All X fonts are bitmapped.
Not all X servers support all fonts. Therefore it is best to check if a specific font has been loaded correctly within your Motif program. There is a standard X application program, xlsfonts, that lists the fonts available on a particular workstation.
Each font or character set name is referred to by a String name. Fonts are loaded into to an Xlib Font structure using the XLoadFont() function with a given Display ID and font name argument. The function returns a Font structure.
Another similar function is XLoadQueryFont() which takes the same arguments as above but returns an XFontStruct which contains the Font structure plus information describing the font.
An example function, load_font() which loads a font named ``fixed'', which should be available on most systems but is still checked for is given below:
void load_font(XFontStruct **font_info)

{  Display *display;
   char *fontname = "fixed";
   XFontStruct *font_info;

   display = XtDisplay(some_widget);

   /* load and get font info structure  */

  if (( *font_info = XLoadQueryFont(display, fontname)) == NULL)
      { /* error - quit early */
         printf("Cannot load  %s font\n",  fontname);
         exit(1);
      }
}
Motif actually possesses its own font loading and setting functions. These include XmFontListCreate(), XmFontListEntryCreate(), XmFontListEntryLoad() and XmFontListAdd() . These are used in a similar fashion to the Xlib functions above except that they return an XmFontList structure. However, in this book, we will be only using fonts at the Xlib level and these Motif functions will not be considered further.
Sometimes we may need to gain more control of events in X. To do this we will need to resort to Xlib. A specific example of this will be met in the Chapter 17 (the draw_input1.c program), where the default interaction, provided via callbacks in Motif, is inadequate for our required form of interaction.
There are many types of events in Xlib. A special XEvent structure is defined to take care of this. (See reference material [Mar96] for full details)
XEvents exist for all kinds of events, including: mouse button presses, mouse motions, key presses and events concerned with the window management. Most of the mouse/keyboard events are self explanatory and we have already studied them a little. Let us look at some window events further:
Note: There is no guarantee that what has previously been drawn to the window will become immediately visible. In fact, it is totally up to the programmer to make sure that this happens by picking up an XExpose event (See Sections 16.4 and 17.3.3 on Pixmaps and DrawingAreas).
Most Motif applications will not need to do this since they can happily run within the standard application main loop event handling model. If you do need to resort to creating your own (Xlib) event handling routines, be warned: it can quickly become complex, involving a lot of Xlib programming.
Since, for the level of Motif programming described in this text, we will not need to resort to writing elaborate event handlers ourselves we will only study the basics of Motif/Xlib event handling and interaction.
The first step along this path is attaching a callback to an XEvent rather than a Widget callback action. From Motif (or Xt) you attach a callback to a particular event with the function XtAddEventHandler(), which takes 5 parameters:
|) masks
together.
As an example we could set an expose_callbck() to be called by an Expose event by the following function call:
XtAddEventHandler(widget, ExposureMask, False,
                  expose_callbck, NULL);
To set a callback, motion_callbk(), that responds to left or middle mouse motion -- an event triggered when the mouse is moved whilst an appropriate mouse butten is depresses -- we would write:
XtAddEventHandler(widget, Button1MotionMask | Button2MotionMask,
                  False, motion_callbk, NULL);
There are two other steps that need to be done when writing our own event handler. These are:
These two steps are basically what the XtAppMainLoop() takes care of in normal operation.
Two Xt functions are typically used in this context:
In between the retrieving of the next event and dispatching this event you may want to write some code that intercepts certain events.
Let us look at how the XtAppMainLoop() function is coded. Note the comments show where we may place custom application intercept code.
void XtAppMainLoop(XtAppContext app)

{ XEvent event;

  for (;;) /* forever */
    { XtAppNextEvent(app, &event);

      /* Xevent read off queue */
      /* inspect structure and intercept perhaps? */

      /* intercept code would go here */

      XtDispatchEvent(&event);
    }
}
PLENTY OF SCOPE HERE
In this section we will look at how we create and use Motif's DrawingArea Widget which is concerned with the display of graphics. We will also put into practice the Xlib drawing and event scheduling routines met in Chapter 16.
To create a DrawingArea Widget, use
XtVaCreateManagedWidget() with
xmDrawingAreaWidgetClass or use
XmCreateDrawingArea() . Remember to include the
<Xm/DrawingA.h> header file.
There is also a DrawnButton Widget which is a combination of a DrawingArea
and a PushButton. There is a
xmDrawnButtonWidgetClass and definitions are
in the <Xm/DrawnB.h> header file.
A DrawingArea will usually be placed inside a container widget --e.g. a Frame or a MainWindow -- and it is frequently scrolled. As such, it usually inherits size and other resources from its parent widget. You can, however, set resources like XmNwidth and XmNheight for the DrawingArea directly. The XmNresizePolicy resource may also need to be set to allow changes in dimension of the DrawingArea in a program. Possible values are:
Three callbacks are associated with this widget :
We are now in a position to draw 2D graphics in Motif. Recall that all graphics drawing is performed at the Xlib level and so we have to attach the higher level motif widgets to the lower level Xlib structures (Chapter 16).
In order to draw anything in a DrawingArea Widget we basically need to do the following:
The draw.c program illustrates basic Motif/Xlib drawing principles:
Fig. 17.1 Output of draw.c
The full program listing is:
#include <Xm/Xm.h>
#include <Xm/MainW.h>
#include <Xm/CascadeB.h>
#include <Xm/DrawingA.h>

/* Prototype functions */

void quit_call(void);
void draw_cbk(Widget , XtPointer ,
         XmDrawingAreaCallbackStruct *);
void load_font(XFontStruct **);

/* XLIB Data */

Display *display;
Screen *screen_ptr;

main(int argc, char *argv[])

{   Widget top_wid, main_w, menu_bar, draw, quit;
    XtAppContext app;
    XGCValues gcv;
    GC gc;


    top_wid = XtVaAppInitialize(&app, "Draw", NULL, 0,
        &argc, argv, NULL,
        XmNwidth,  500,
        XmNheight, 500,
        NULL);

    main_w = XtVaCreateManagedWidget("main_window",
        xmMainWindowWidgetClass,   top_wid,
        NULL);

    menu_bar = XmCreateMenuBar(main_w, "main_list",
        NULL, 0);
    XtManageChild(menu_bar);

     /* create quit widget + callback */

   quit = XtVaCreateManagedWidget( "Quit",
        xmCascadeButtonWidgetClass, menu_bar,
        XmNmnemonic, 'Q',
        NULL);


    XtAddCallback(quit, XmNactivateCallback, quit_call,
                  NULL);

    /* Create a DrawingArea widget. */
    draw = XtVaCreateWidget("draw",
        xmDrawingAreaWidgetClass, main_w,
        NULL);

    /* get XLib Display Screen and Window ID's  for draw */

    display = XtDisplay(draw);
    screen_ptr = XtScreen(draw);

/* set the DrawingArea as the "work area" of main window */
    XtVaSetValues(main_w,
        XmNmenuBar,    menu_bar,
        XmNworkWindow, draw,
        NULL);

    /* add callback for exposure event */
    XtAddCallback(draw, XmNexposeCallback, draw_cbk, NULL);

    /* Create a GC. Attach GC to the DrawingArea's
       XmNuserData.
       NOTE : This is a useful method to pass data */

    gcv.foreground = BlackPixelOfScreen(screen_ptr);
    gc = XCreateGC(display,
        RootWindowOfScreen(screen_ptr), GCForeground, &gcv);
    XtVaSetValues(draw, XmNuserData, gc, NULL);

    XtManageChild(draw);
    XtRealizeWidget(top_wid);
    XtAppMainLoop(app);
}


/* CALL BACKS */

void quit_call()

{   printf("Quitting program\n");
    exit(0);
}

/*  DrawingArea Callback. NOTE: cbk->reason says type of
    callback event */

void
draw_cbk(Widget w, XtPointer data,
         XmDrawingAreaCallbackStruct *cbk)

{   char  str1[25];
    int len1, width1, font_height;
    unsigned int width, height;
    int  x, y, angle1, angle2, x_end, y_end;
    unsigned int line_width = 1;
    int line_style = LineSolid;
    int cap_style = CapRound;
    int join_style = JoinRound;
    XFontStruct *font_info;
    XEvent *event = cbk->event;
    GC gc;
    Window win = XtWindow(w);


  if (cbk->reason != XmCR_EXPOSE)
     { /* Should NEVER HAPPEN for this program */
       printf("X is screwed up!!\n");
       exit(0);
     }

   /* get font info */

   load_font(&font_info);

   font_height = font_info->ascent + font_info->descent;

   /* get gc from Drawing Area user data */

   XtVaGetValues(w, XmNuserData, &gc, NULL);

  /* DRAW A RECTANGLE */

  x = y = 10;
  width = 100;
  height = 50;

  XDrawRectangle(display, win, gc, x, y, width, height);

  strcpy(str1,"RECTANGLE");
  len1 = strlen(str1);
  y += height + font_height + 1;
   if ( (x = (x + width/2) - len1/2) < 0 ) x = 10;

  XDrawString(display, win, gc, x, y, str1, len1);

  /* Draw a filled rectangle */

  x = 10; y = 150;
  width = 80;
  height = 70;

  XFillRectangle(display, win, gc, x, y, width, height);

  strcpy(str1,"FILLED RECTANGLE");
  len1 = strlen(str1);
  y += height + font_height + 1;
  if ( (x = (x + width/2) - len1/2) < 0 ) x = 10;

  XDrawString(display, win, gc, x, y, str1, len1);


  /* draw an arc */

  x = 200; y = 10;
  width = 80;
  height = 70;
  angle1 = 180 * 64; /* 180 degrees */
  angle2 = 90 * 64; /* 90 degrees */

  XDrawArc(display, win, gc, x, y, width, height,
           angle1, angle2);

  strcpy(str1,"ARC");
  len1 = strlen(str1);
  y += height + font_height + 1;
  if ( (x = (x + width/2) - len1/2) < 0 ) x = 200;

  XDrawString(display, win, gc, x, y, str1, len1);

  /* draw a filled arc */

  x = 200; y = 200;
  width = 100;
  height = 50;
  angle1 = 270 * 64; /* 270 degrees */
  angle2 = 180 * 64; /* 180 degrees */

  XFillArc(display, win, gc, x, y, width, height,
           angle1, angle2);

  strcpy(str1,"FILLED ARC");
  len1 = strlen(str1);
  y += height + font_height + 1;
  if ( (x = (x + width/2) - len1/2) < 0 ) x = 200;

  XDrawString(display, win, gc, x, y, str1, len1);

  /* SOLID LINE */

  x = 10; y = 300;
  /* start and end points of line */
  x_end = 200; y_end = y - 30;
  XDrawLine(display, win, gc, x, y, x_end, y_end);

  strcpy(str1,"SOLID LINE");
  len1 = strlen(str1);
  y += font_height + 1;
  if ( (x = (x + x_end)/2 - len1/2) < 0 ) x = 10;

  XDrawString(display, win, gc, x, y, str1, len1);

  /* DASHED LINE */

  line_style = LineOnOffDash;
  line_width = 2;

  /* set line attributes */

   XSetLineAttributes(display, gc, line_width, line_style,
                      cap_style, join_style);

  x = 10; y = 350;
  /* start and end points of line */
  x_end = 200; y_end = y - 30;
  XDrawLine(display, win, gc, x, y, x_end, y_end);

  strcpy(str1,"DASHED LINE");
  len1 = strlen(str1);
  y += font_height + 1;
  if ( (x = (x + x_end)/2 - len1/2) < 0 ) x = 10;

  XDrawString(display, win, gc, x, y, str1, len1);
 }


void load_font(XFontStruct **font_info)

{  char *fontname = "fixed";
    XFontStruct *XLoadQueryFont();

   /* load and get font info structure  */

  if (( *font_info = XLoadQueryFont(display, fontname))
        == NULL)
      { /* error - quit early */
         printf("%s: Cannot load  %s font\n", "draw.c",
                fontname);
         exit(-1);
      }
}
The previous program only illustrated one aspect of the DrawingArea widget, i.e. displaying graphics. Another important aspect of this widget is how the widget accepts input. In this Section we will develop a program that illustrate how input is processed in the DrawingArea. We will write a program, draw_input1.c, that highlights some deficiencies in the default event handling capabilities within a practical application.
The draw_input1.c program accepts mouse input in the DrawingArea. It allows the user to select a colour (as we have seen previously) and then draw a variable size rectangle that is shaded with the chosen colour. A clear DrawingArea facility is also provided.
Fig. 17.2 Output of draw_input1.c
In order to achieve a practical and intuitive manner of user interaction we will need to detect 3 different mouse events (all events described below refer to the left mouse button):
Fig. 17.3 Silhouette outline of rectangle during input ( draw_input1.c)
To detect mouse clicks up and down we can use the XmNinputCallback resource. However, the default setting of callback resources in a DrawingArea Widget does not allow for mouse motion to be detected as we would like. We therefore have to override the default callback options.
Every Widget has a Translation Table (Section 5.8.2) that contains a list of events that it can receive and actions that it is to take upon receipt of an event. We basically have to create a new translation table to achieve our desired interaction described above.
We have already defined the translation table format in Section 5.8.2. A translation table consists of events like the below excerpt of the default DrawingArea translation:
   ..............
   <Btn1Down>:    DrawingAreaInput() ManagerGadgetArm()
   <Btn1Up>:      DrawingAreaInput() ManagerGadgetActivate()
   <Btn1Motion>:  ManagerGadgetButtonMotion()
   ..............
Our particular problem is that button motion does not get passed to the DrawingAreaInput() function that notifies the program of an input event.
To create a new translation table, for our purpose, we simply include the functions and events we need. In this case:
 <Btn1Down>:   draw_cbk(down) ManagerGadgetArm()
 <Btn1Up>:     draw_cbk(up) ManagerGadgetActivate()
 <Btn1Motion>: draw_cbk(motion) ManagerGadgetButtonMotion()
where draw_cbk() is our callback that performs the drawing. We use the same callback to detect each mouse button down, up or motion action. This is achieved by sending a message to the callback that identifies each action. The arm, activate and motion gadget manager functions control the (default) display of an event action.
In a motif program, we set up our translation table in a String structure and use the XtParseTranslationTable(String*) to attach a translation table to the XmNtranslations resource. We must also register the callback with the actions associated with the translation events. We use the XtAppAddActions() function to do this.
For the above example we create the String as follows:
String translations =
"<Btn1Motion>: draw_cbk(motion)
               ManagerGadgetButtonMotion() \n\
<Btn1Down>: draw_cbk(down) ManagerGadgetArm() \n\
<Btn1Up>: draw_cbk(up) ManagerGadgetActivate()";
and register the callback and create a DrawingArea widget with the correct actions with the following code:
    actions.string = "draw_cbk";
    actions.proc = draw_cbk;
    XtAppAddActions(app, &actions, 1);

    draw = XtVaCreateWidget("draw",
     xmDrawingAreaWidgetClass, main_w,
     XmNtranslations, XtParseTranslationTable(translations),
     XmNbackground, WhitePixelOfScreen(XtScreen(main_w)),
     NULL);
The Callback function would be prototyped by:
draw_cbk(Widget w, XButtonEvent *event, String *args, int *num_args).
On calling the function, we simply inspect the args[0] String to
see if an up, down or motion event has occurred and take the
approptriate actions described below:
The complete program listing of draw_input1.c is :
#include <Xm/Xm.h>
#include <Xm/MainW.h>
#include <Xm/CascadeB.h>
#include <Xm/DrawingA.h>

/* Prototype callbacks */

void quit_call(void);
void clear_call(void);
void colour_call(Widget , int);
void draw_cbk(Widget , XButtonEvent *,
               String *, int *);

GC gc;
XGCValues gcv;
Widget draw;
String colours[] = { "Black",  "Red", "Green", "Blue",
                     "Grey", "White"};
long int fill_pixel = 1; /* stores current colour
                         of fill - black default */
Display *display; /* xlib id of display */
Colormap cmap;

main(int argc, char *argv[])

{   Widget top_wid, main_w, menu_bar, quit, clear, colour;
    XtAppContext app;
    XmString  quits, clears, colourss, red, green,
              blue, black, grey, white;
    XtActionsRec actions;


    String translations =
"<Btn1Motion>: draw_cbk(motion)
               ManagerGadgetButtonMotion() \n\
<Btn1Down>: draw_cbk(down) ManagerGadgetArm() \n\
<Btn1Up>: draw_cbk(up) ManagerGadgetActivate()";

    top_wid = XtVaAppInitialize(&app, "Draw", NULL, 0,
        &argc, argv, NULL,
        XmNwidth,  500,
        XmNheight, 500,
        NULL);

    main_w = XtVaCreateManagedWidget("main_window",
        xmMainWindowWidgetClass,   top_wid,
        XmNwidth, 500,
        XmNheight, 500,
        NULL);

    /* Create a simple MenuBar that contains three menus */
    quits = XmStringCreateLocalized("Quit");
    clears = XmStringCreateLocalized("Clear");
    colourss = XmStringCreateLocalized("Colour");

    menu_bar = XmVaCreateSimpleMenuBar(main_w, "main_list",
        XmVaCASCADEBUTTON, quits, 'Q',
        XmVaCASCADEBUTTON, clears, 'C',
        XmVaCASCADEBUTTON, colourss, 'o',
        NULL);

    XtManageChild(menu_bar);


/* First menu is quit menu -- callback is quit_call() */

    XmVaCreateSimplePulldownMenu(menu_bar, "quit_menu", 0,
        quit_call, XmVaPUSHBUTTON, quits, 'Q', NULL, NULL,
        NULL);
    XmStringFree(quits);

/* Second menu is clear menu -- callback is clear_call() */

    XmVaCreateSimplePulldownMenu(menu_bar, "clear_menu", 1,
        clear_call, XmVaPUSHBUTTON, clears, 'C', NULL, NULL,
        NULL);
    XmStringFree(clears);

     /* create colour pull down menu */

    black = XmStringCreateLocalized(colours[0]);
    red = XmStringCreateLocalized(colours[1]);
    green = XmStringCreateLocalized(colours[2]);
    blue = XmStringCreateLocalized(colours[3]);
    grey = XmStringCreateLocalized(colours[4]);
    white = XmStringCreateLocalized(colours[5]);

    colour = XmVaCreateSimplePulldownMenu(menu_bar,
        "edit_menu", 2, colour_call,
        XmVaRADIOBUTTON, black, 'k', NULL, NULL,
        XmVaRADIOBUTTON, red, 'R', NULL, NULL,
        XmVaRADIOBUTTON, green, 'G', NULL, NULL,
        XmVaRADIOBUTTON, blue, 'B', NULL, NULL,
        XmVaRADIOBUTTON, grey, 'e', NULL, NULL,
        XmVaRADIOBUTTON, white, 'W', NULL, NULL,
        XmNradioBehavior, True,
        /* RowColumn resources to enforce */
        XmNradioAlwaysOne, True,
        /* radio behavior in Menu */
        NULL);

    XmStringFree(black);
    XmStringFree(red);
    XmStringFree(green);
    XmStringFree(blue);
    XmStringFree(grey);
    XmStringFree(white);


    /* Create a DrawingArea widget. */
    /* make new actions */

    actions.string = "draw_cbk";
    actions.proc = draw_cbk;
    XtAppAddActions(app, &actions, 1);

    draw = XtVaCreateWidget("draw",
     xmDrawingAreaWidgetClass, main_w,
     XmNtranslations, XtParseTranslationTable(translations),
     XmNbackground, WhitePixelOfScreen(XtScreen(main_w)),
     NULL);
    cmap = DefaultColormapOfScreen(XtScreen(draw));
    display = XtDisplay(draw);

/* set the DrawingArea as the "work area" of main window */
    XtVaSetValues(main_w,
        XmNmenuBar,    menu_bar,
        XmNworkWindow, draw,
        NULL);


/* Create a GC. Attach GC to DrawingArea's XmNuserData. */
    gcv.foreground = BlackPixelOfScreen(XtScreen(draw));
    gc = XCreateGC(XtDisplay(draw),
        RootWindowOfScreen(XtScreen(draw)),
        GCForeground, &gcv);

    XtManageChild(draw);
    XtRealizeWidget(top_wid);
    XtAppMainLoop(app);
}

/* CALL BACKS */

void quit_call()

{   printf("Quitting program\n");
    exit(0);
}

void clear_call() /* clear work area */

{ XClearWindow(display, XtWindow(draw));
}


/* called from any of the "Colour" menu items.
   Change the colour of the label widget.
   Note: we have to use dynamic setting with setargs()..
 */

void
colour_call(Widget w, int item_no)

  /*  w -- menu item that was selected */
  /*  item_no --- the index into the menu */

{
    int n =0;
    Arg args[1];

    XColor xcolour, spare; /* xlib colour struct */

    if (XAllocNamedColor(display, cmap, colours[item_no],
        &xcolour, &spare) == 0)
       return;

    /* remember new colour */
    fill_pixel = xcolour.pixel;
}

/*  DrawingArea Callback.*/

void  draw_cbk(Widget w, XButtonEvent *event,
               String *args, int *num_args)

{   static Position x, y, last_x, last_y;
    Position width, height;

    int line_style;
    unsigned int line_width = 1;
    int cap_style = CapRound;
    int join_style = JoinRound;

    if (strcmp(args[0], "down") == 0)
          {  /* anchor initial point (save its value) */
            x = event->x;
            y = event->y;
          }
     else
       if (strcmp(args[0], "motion") == 0)
          { /* draw "ghost" box to show where it could go */
             /* undraw last box */

             line_style = LineOnOffDash;

             /* set line attributes */

             XSetLineAttributes(event->display, gc,
              line_width, line_style, cap_style, join_style);

             gcv.foreground
               = WhitePixelOfScreen(XtScreen(w));

             XSetForeground(event->display, gc,
                            gcv.foreground);

             XSetFunction(event->display, gc, GXinvert);


            XDrawLine(event->display, event->window, gc,
                       x, y, last_x, y);
            XDrawLine(event->display, event->window, gc,
                       last_x, y, last_x, last_y);
            XDrawLine(event->display, event->window, gc,
                       last_x, last_y, x, last_y);
            XDrawLine(event->display, event->window, gc,
                       x, last_y, x, y);

            /* Draw New Box */
            gcv.foreground
              = BlackPixelOfScreen(XtScreen(w));
            XSetForeground(event->display, gc,
                   gcv.foreground);

            XDrawLine(event->display, event->window, gc,
                      x, y, event->x, y);
            XDrawLine(event->display, event->window, gc,
                      event->x, y, event->x, event->y);
            XDrawLine(event->display, event->window, gc,
                      event->x, event->y, x, event->y);
            XDrawLine(event->display, event->window, gc,
                      x, event->y, x, y);
          }

        else
         if (strcmp(args[0], "up") == 0)
          { /* draw full line */

             XSetFunction(event->display, gc, GXcopy);

             line_style = LineSolid;

             /* set line attributes */

             XSetLineAttributes(event->display, gc,
        line_width, line_style, cap_style, join_style);

             XSetForeground(event->display, gc, fill_pixel);

            XDrawLine(event->display, event->window, gc,
                      x, y, event->x, y);
            XDrawLine(event->display, event->window, gc,
                      event->x, y, event->x, event->y);
            XDrawLine(event->display, event->window, gc,
                      event->x, event->y, x, event->y);
            XDrawLine(event->display, event->window, gc,
                      x, event->y, x, y);

            width = event->x - x;
            height = event->y - y;
            XFillRectangle(event->display, event->window,
                           gc, x, y, width, height);
          }
          last_x = event->x;
          last_y = event->y;

}
One problem the draw_input1.c program has is that if the window was covered and then exposed the picture would not redraw itself (Section 16.6). To see this for yourself run the draw_input1.c obscure the MainWindow with another window and then click on the draw_input1.c frame to bring it to the foreground and note the appearance of the window.
Indeed, the best method to store the picture we draw is via a Pixmap . Since the drawing in this application is an interactive process it would be very difficult to redraw the picture unless we used Pixmaps. There is no way that we could predict how the user would use the application and storing each drawing stroke would become complex. The best approach is to store the drawing data in a Pixmap by writing directly to a Pixmap. Obtaining an immediate visual feedback is also important (the user needs to see what he has drawn) so we also draw directly to the display when data is being input. When an expose event is detected all we need to do is remap the pixmap to the window.
The draw_input2.c program does exactly the same task as draw_input1.c but draws to a pixmap which can be remapped to the window upon an exposure.
The major differences between the programs are:
The draw_input2.c program listing is as follows:
#include <Xm/Xm.h>
#include <Xm/MainW.h>
#include <Xm/CascadeB.h>
#include <Xm/DrawingA.h>

/* Prototype callbacks */

void quit_call(void);
void clear_call(void);
void colour_call(Widget , int);
void draw_cbk(Widget , XButtonEvent *, String *, int *);
void expose(Widget , XtPointer ,
            XmDrawingAreaCallbackStruct *);

GC gc;
XGCValues gcv;
Widget draw;
Display *display; /* xlib id of display */
Screen *screen;
Colormap cmap;
Pixmap pix;
Dimension width, height; /* store size of pixmap */
String colours[] = { "Black",  "Red", "Green", "Blue",
                     "Grey", "White"};
long int fill_pixel = 1;  /* stores current colour of fill
                             - black default */

main(int argc, char *argv[])

{   Widget top_wid, main_w, menu_bar, quit, clear, colour;
    XtAppContext app;
    XmString  quits, clears, colourss, red, green, blue,
              black, grey, white;
    XtActionsRec actions;


    String translations =
        "<Btn1Motion>: draw_cbk(motion) ManagerGadgetButtonMotion() \n\
         <Btn1Down>: draw_cbk(down) ManagerGadgetArm() \n\
         <Btn1Up>: draw_cbk(up) ManagerGadgetActivate()";

    top_wid = XtVaAppInitialize(&app, "Draw", NULL, 0,
        &argc, argv, NULL,
        NULL);

    main_w = XtVaCreateManagedWidget("main_window",
        xmMainWindowWidgetClass,   top_wid,
        NULL);

    /* Create a simple MenuBar that contains three menus */
    quits = XmStringCreateLocalized("Quit");
    clears = XmStringCreateLocalized("Clear");
    colourss = XmStringCreateLocalized("Colour");

    menu_bar = XmVaCreateSimpleMenuBar(main_w, "main_list",
        XmVaCASCADEBUTTON, quits, 'Q',
        XmVaCASCADEBUTTON, clears, 'C',
        XmVaCASCADEBUTTON, colourss, 'o',
        NULL);

    XtManageChild(menu_bar);


    /* First menu is the quit menu
         -- callback is quit_call() */

    XmVaCreateSimplePulldownMenu(menu_bar, "quit_menu", 0,
        quit_call,
        XmVaPUSHBUTTON, quits, 'Q', NULL, NULL,
        NULL);
    XmStringFree(quits);

    /* Second menu is the clear menu
          -- callback is clear_call() */

    XmVaCreateSimplePulldownMenu(menu_bar, "clear_menu", 1,
        clear_call,
        XmVaPUSHBUTTON, clears, 'C', NULL, NULL,
        NULL);
    XmStringFree(clears);


    /* create colour pull down menu */

    black = XmStringCreateLocalized(colours[0]);
    red = XmStringCreateLocalized(colours[1]);
    green = XmStringCreateLocalized(colours[2]);
    blue = XmStringCreateLocalized(colours[3]);
    grey = XmStringCreateLocalized(colours[4]);
    white = XmStringCreateLocalized(colours[5]);

    colour = XmVaCreateSimplePulldownMenu(menu_bar, "edit_menu", 2,
       colour_call,
        XmVaRADIOBUTTON, black, 'k', NULL, NULL,
        XmVaRADIOBUTTON, red, 'R', NULL, NULL,
        XmVaRADIOBUTTON, green, 'G', NULL, NULL,
        XmVaRADIOBUTTON, blue, 'B', NULL, NULL,
        XmVaRADIOBUTTON, grey, 'e', NULL, NULL,
        XmVaRADIOBUTTON, white, 'W', NULL, NULL,
        XmNradioBehavior, True,  /* RowColumn resources set */
        XmNradioAlwaysOne, True, /* radio behavior in Menu */
        NULL);
    XmStringFree(black);
    XmStringFree(red);
    XmStringFree(green);
    XmStringFree(blue);
    XmStringFree(grey);
    XmStringFree(white);


    /* Create a DrawingArea widget. */

    /* make new actions */

    actions.string = "draw_cbk";
    actions.proc = draw_cbk;
    XtAppAddActions(app, &actions, 1);

    draw = XtVaCreateWidget("draw",
        xmDrawingAreaWidgetClass, main_w,
        XmNtranslations, XtParseTranslationTable(translations),
        XmNbackground, WhitePixelOfScreen(XtScreen(main_w)),
        XmNwidth, 500,
        XmNheight, 500,
        NULL);

    cmap = DefaultColormapOfScreen(XtScreen(draw));
    display = XtDisplay(draw);
    screen = XtScreen(draw);

    /* Create a GC. Attach GC to the DrawingArea's XmNuserData. */
    gcv.foreground = BlackPixelOfScreen(XtScreen(draw));
    gc = XCreateGC(XtDisplay(draw),
        RootWindowOfScreen(XtScreen(draw)), GCForeground, &gcv);

    /* get pixmap of DrawingArea */
    XtVaGetValues(draw, XmNwidth, &width, XmNheight, &height, NULL);

    pix = XCreatePixmap(display, RootWindowOfScreen(screen),
                        width, height, DefaultDepthOfScreen(screen));

    /* initial white pixmap */
    XSetForeground(XtDisplay(draw), gc,
        WhitePixelOfScreen(XtScreen(draw)));

    XFillRectangle(display, pix, gc, 0, 0, width, height);

    /* reset gc with current colour */
    XSetForeground(display, gc, fill_pixel);

    /* set the DrawingArea as the "work area" of the main window */
    XtVaSetValues(main_w,
        XmNmenuBar,    menu_bar,
        XmNworkWindow, draw,
        NULL);

    /* add callback for exposure event */
    XtAddCallback(draw, XmNexposeCallback, expose, NULL);

    XtManageChild(draw);
    XtRealizeWidget(top_wid);
    XtAppMainLoop(app);
}

/* CALL BACKS */

void quit_call()

{   printf("Quitting program\n");
    exit(0);
}

void clear_call(Widget w, int item_no) /* clear work area */

{ /* clear pixmap with white */
    XSetForeground(XtDisplay(draw), gc,
        WhitePixelOfScreen(XtScreen(draw)));

    XFillRectangle(display, pix, gc, 0, 0, width, height);

    /* reset gc with current colour */
    XSetForeground(display, gc, fill_pixel);

    /* copy pixmap to window of drawing area */

    XCopyArea(display, pix, XtWindow(draw), gc,
        0, 0, width, height, 0, 0);
}

/* expose is called whenever all or portions of the drawing area is
   exposed.
 */

void
expose(Widget draw, XtPointer client_data,
       XmDrawingAreaCallbackStruct *cbk)

{   XCopyArea(cbk->event->xexpose.display, pix, cbk->window, gc,
        0, 0, width, height, 0, 0);
}


/* called from any of the "Colour" menu items.
   Change the colour of the label widget.
   Note: we have to use dynamic setting with setargs().
*/

void
colour_call(Widget w, int item_no)

/* w = menu item that was selected
   item_no = the index into the menu
*/

{
    int n =0;
    Arg args[1];

    XColor xcolour, spare; /* xlib color struct */


    if (XAllocNamedColor(display, cmap, colours[item_no],
                         &xcolour, &spare) == 0)
       return;

    /* remember new colour */
    fill_pixel = xcolour.pixel;
}


/*  DrawingArea Callback */


void  draw_cbk(Widget w, XButtonEvent *event,
               String *args, int *num_args)

{
    static Position x, y, last_x, last_y;
    Position width, height;

    int line_style;
    unsigned int line_width = 1;
    int cap_style = CapRound;
    int join_style = JoinRound;


        if (strcmp(args[0], "down") == 0)
          {  /* anchor initial point (i.e., save its value) */
            x = event->x;
            y = event->y;

          }
       else
         if (strcmp(args[0], "motion") == 0)
          { /* draw "ghost" box to show where it could go */

             /* undraw last box */

             line_style = LineOnOffDash;

             /* set line attributes */

             XSetLineAttributes(event->display, gc, line_width,
                                line_style, cap_style, join_style);

             gcv.foreground = WhitePixelOfScreen(XtScreen(w));
             XSetForeground(event->display, gc, gcv.foreground);

             XSetFunction(event->display, gc, GXinvert);


            XDrawLine(event->display, event->window, gc,
                      x, y, last_x, y);
            XDrawLine(event->display, event->window, gc,
                      last_x, y, last_x, last_y);
            XDrawLine(event->display, event->window, gc,
                      last_x, last_y, x, last_y);
            XDrawLine(event->display, event->window, gc,
                      x, last_y, x, y);

            /* Draw New Box */

            gcv.foreground = BlackPixelOfScreen(XtScreen(w));
            XSetForeground(event->display, gc, gcv.foreground);

            XDrawLine(event->display, event->window, gc,
                      x, y, event->x, y);
            XDrawLine(event->display, event->window, gc,
                      event->x, y, event->x, event->y);
            XDrawLine(event->display, event->window, gc,
                      event->x, event->y, x, event->y);
            XDrawLine(event->display, event->window, gc,
                      x, event->y, x, y);

          }
        else
         if (strcmp(args[0], "up") == 0)
          { /* draw full line; get GC and use in XDrawLine() */

             XSetFunction(event->display, gc, GXcopy);

             line_style = LineSolid;

             /* set line attributes */

             XSetLineAttributes(event->display, gc,
               line_width, line_style, cap_style, join_style);

             XSetForeground(event->display, gc, fill_pixel);

             XDrawLine(event->display, event->window, gc,
                       x, y, event->x, y);
             XDrawLine(event->display, event->window, gc,
                       event->x, y, event->x, event->y);
             XDrawLine(event->display, event->window, gc,
                       event->x, event->y, x, event->y);
             XDrawLine(event->display, event->window, gc,
                       x, event->y, x, y);

            width = event->x - x;
            height = event->y - y;
            XFillRectangle(event->display, event->window, gc,
                           x, y, width, height);

            /* only need to draw final selection to pixmap */

            XDrawLine(event->display, pix, gc,
                      x, y, event->x, y);
            XDrawLine(event->display, pix, gc,
                      event->x, y, event->x, event->y);
            XDrawLine(event->display, pix, gc,
                      event->x, event->y, x, event->y);
            XDrawLine(event->display, pix, gc,
                      x, event->y, x, y);

            XFillRectangle(event->display, pix, gc,
                           x, y, width, height);
          }

          last_x = event->x;
          last_y = event->y;

}
NEED SOME EXERCISE -- RUN
This document was generated using the LaTeX2HTML translator Version 97.1 (release) (July 13th, 1997)
Copyright © 1993, 1994, 1995, 1996, 1997, Nikos Drakos, Computer Based Learning Unit, University of Leeds.
The command line arguments were:
latex2html -split 1 -address dave@cs.cf.ac.uk X_book_caller.
The translation was initiated by Dave Marshall on 1/4/1999